
Quickstart
This guide walks you through the process, from initial setup to deploying your trained model and conducting your first inference test in minutes.
Step 1 - Account Setup
To get started, create a free Datature account from this link. Complete the verification steps as instructed and log in once finished.
Step 2 - Create a Project
Workspace is an isolated space linked to a specific billing account (Read more). You can manage account-related information, including billing, collaborator invitations, and quota usage, in the workspace settings.
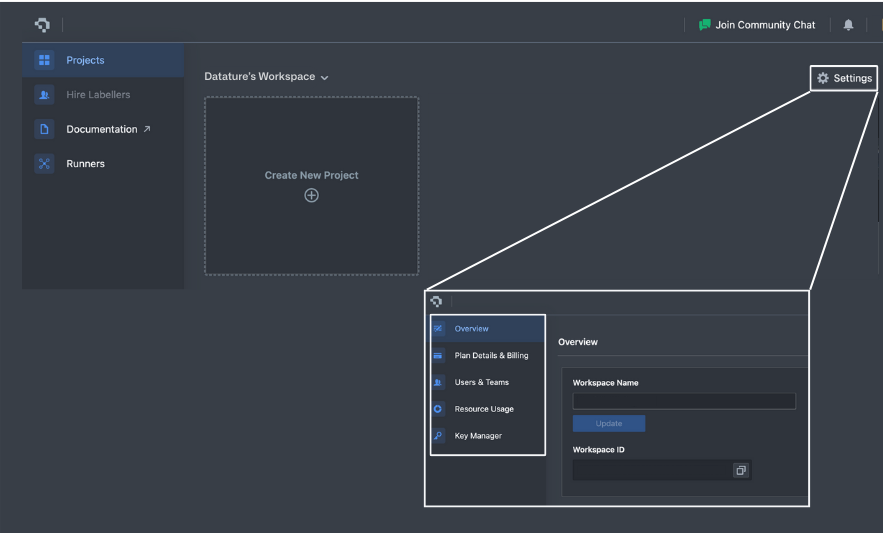
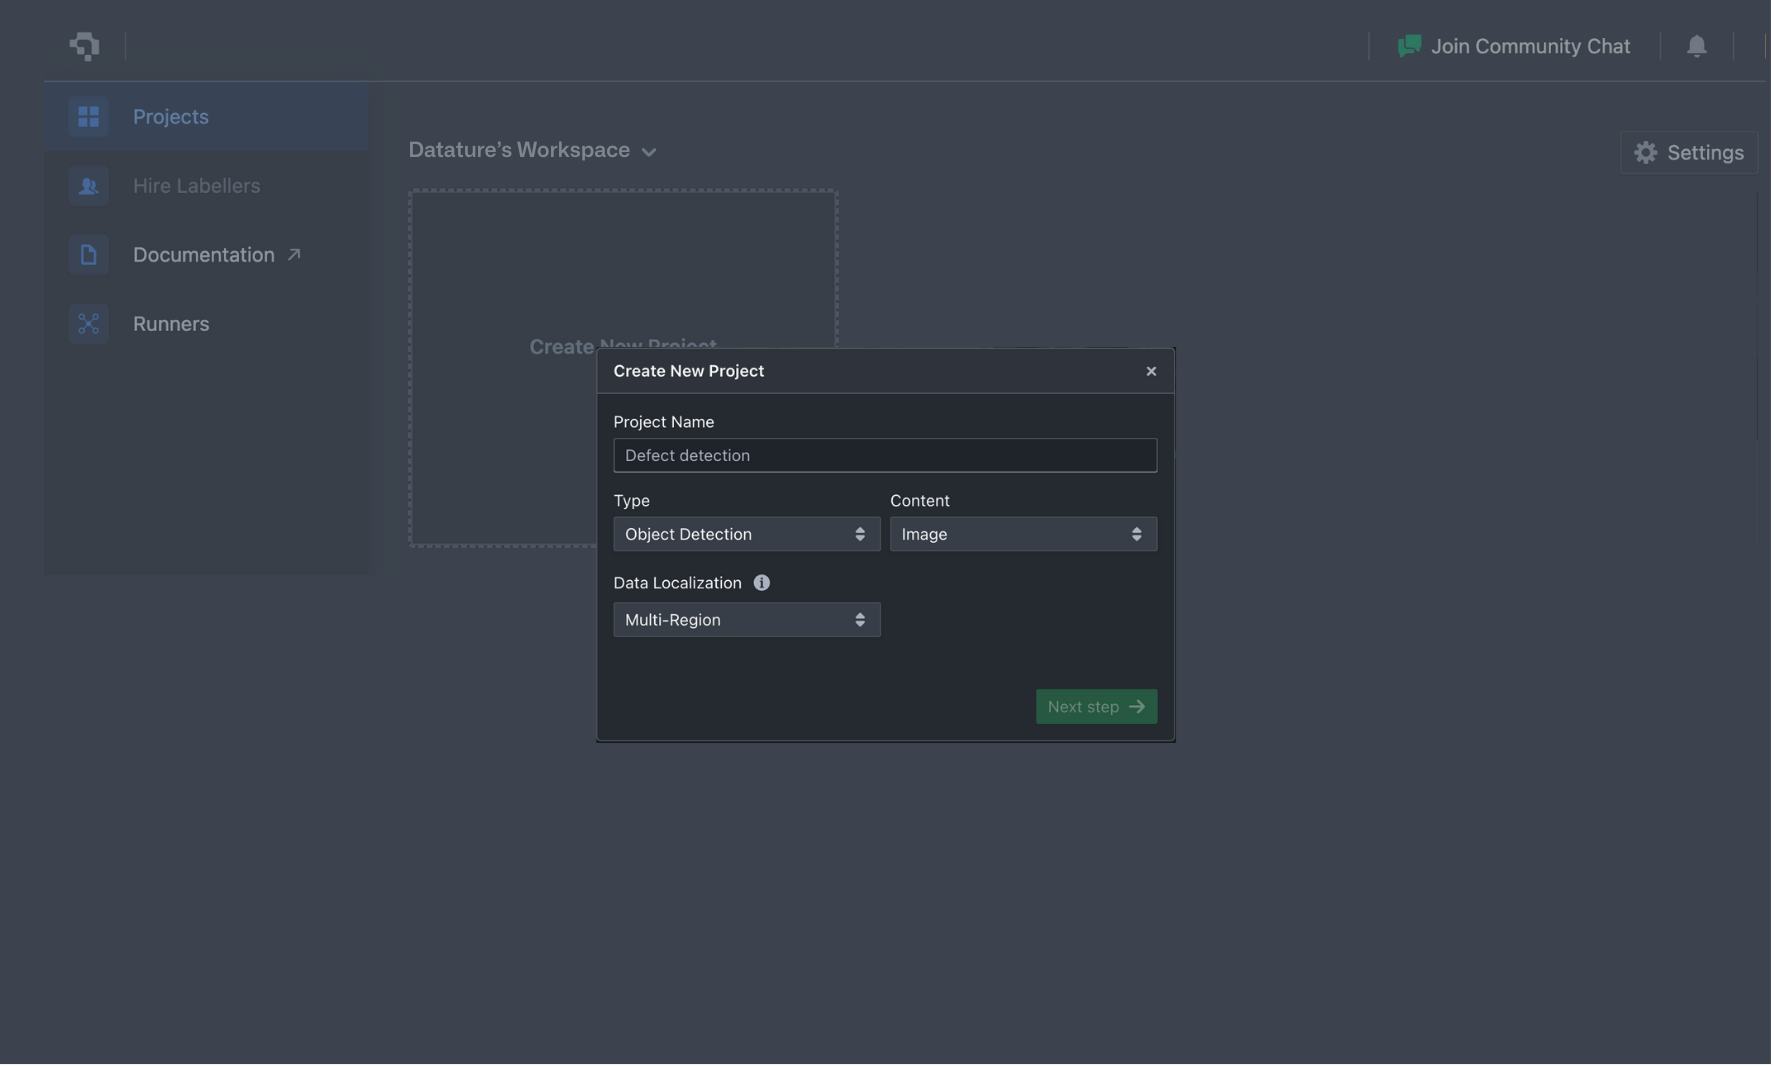
To create your first project, click "Create New Project," enter the project name and details, then click "Next Step."
For collaboration, refer to Managing Project Collaborators to add or remove team members.
Step 3 - Upload Data
After starting a new project, you'll see the main dashboard. To upload images for annotation, click the upload button or the 'Dataset' tab on the sidebar.
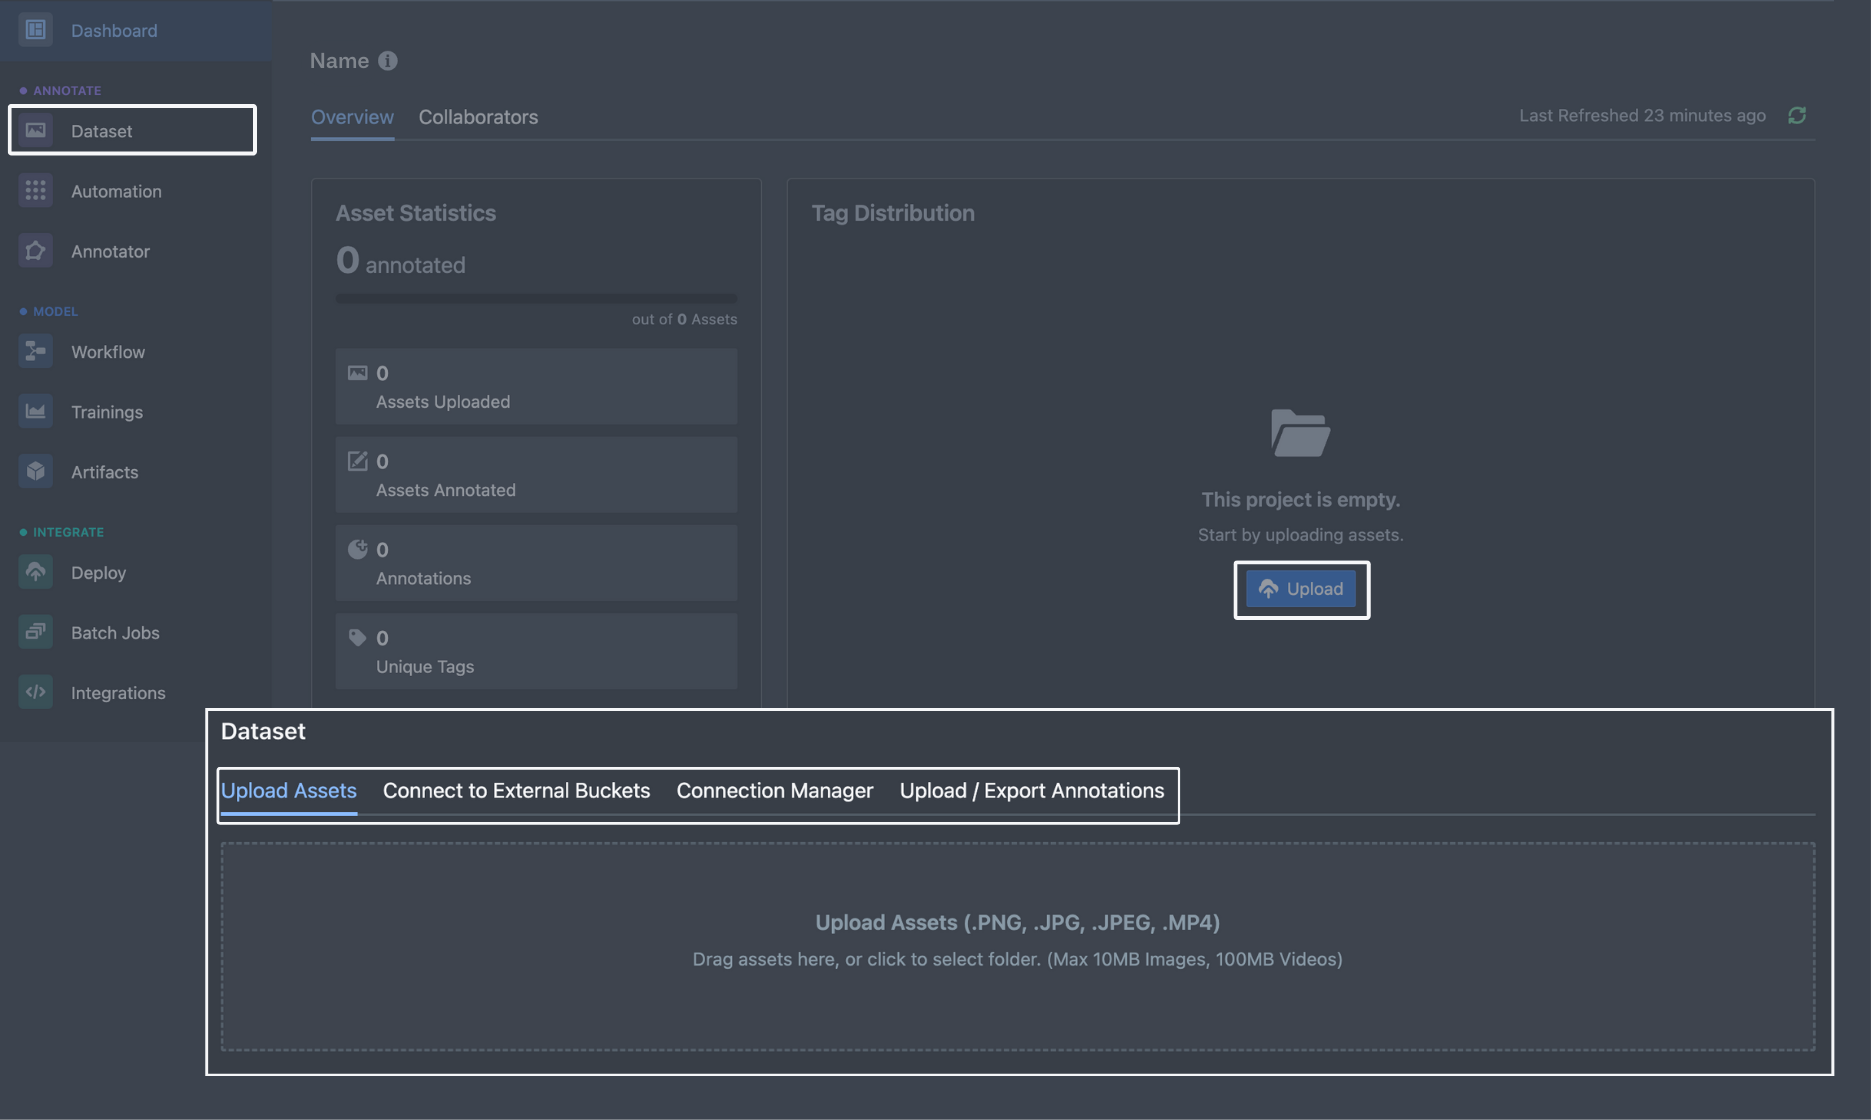
You have three upload options:
- Upload through the Interface: Drag and drop your files or click to select them from your computer. Click Next, indicate any preferred Group Name, and click 'Upload Files' button.
- Use External Storage: Connect to Amazon S3, Azure Blob Storage, or Google Cloud Storage.
- Upload Programmatically: Use the Command Line Interface (CLI) or Software Development Kit (SDK).
For large uploads, we recommend using the CLI or syncing with external storage. Learn more about uploading data here.
Step 4 - Annotate Data
Now that you have uploaded images, let's annotate the first image!
Annotations are labels you place on images to teach the computer what objects to look for. Here's how to do it:
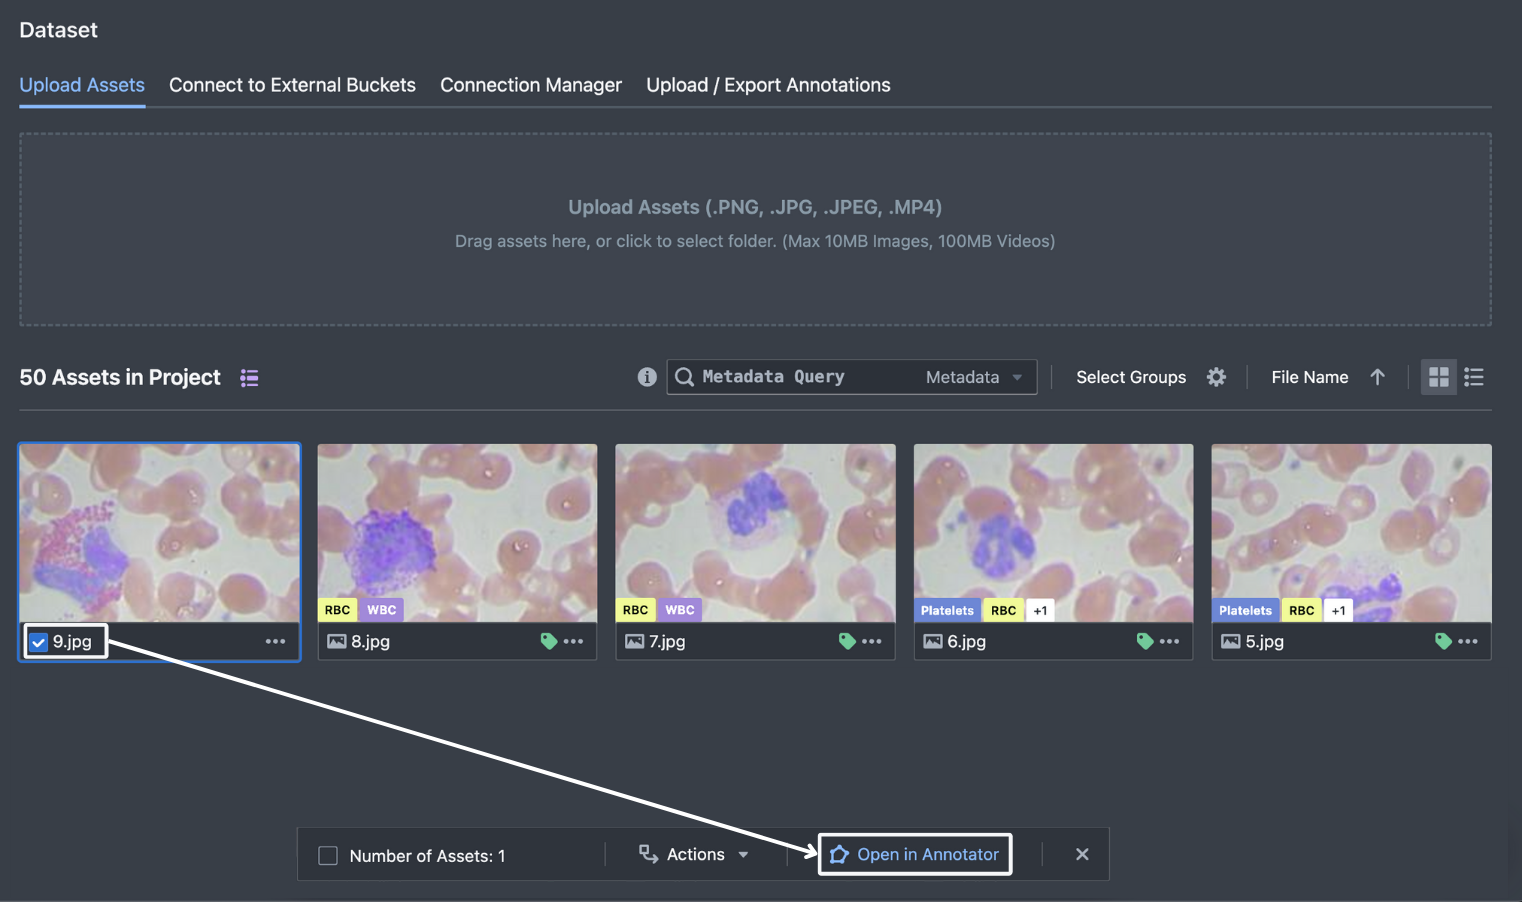
- Open the Annotator
- Select your uploaded images
- Click 'Open in annotator'
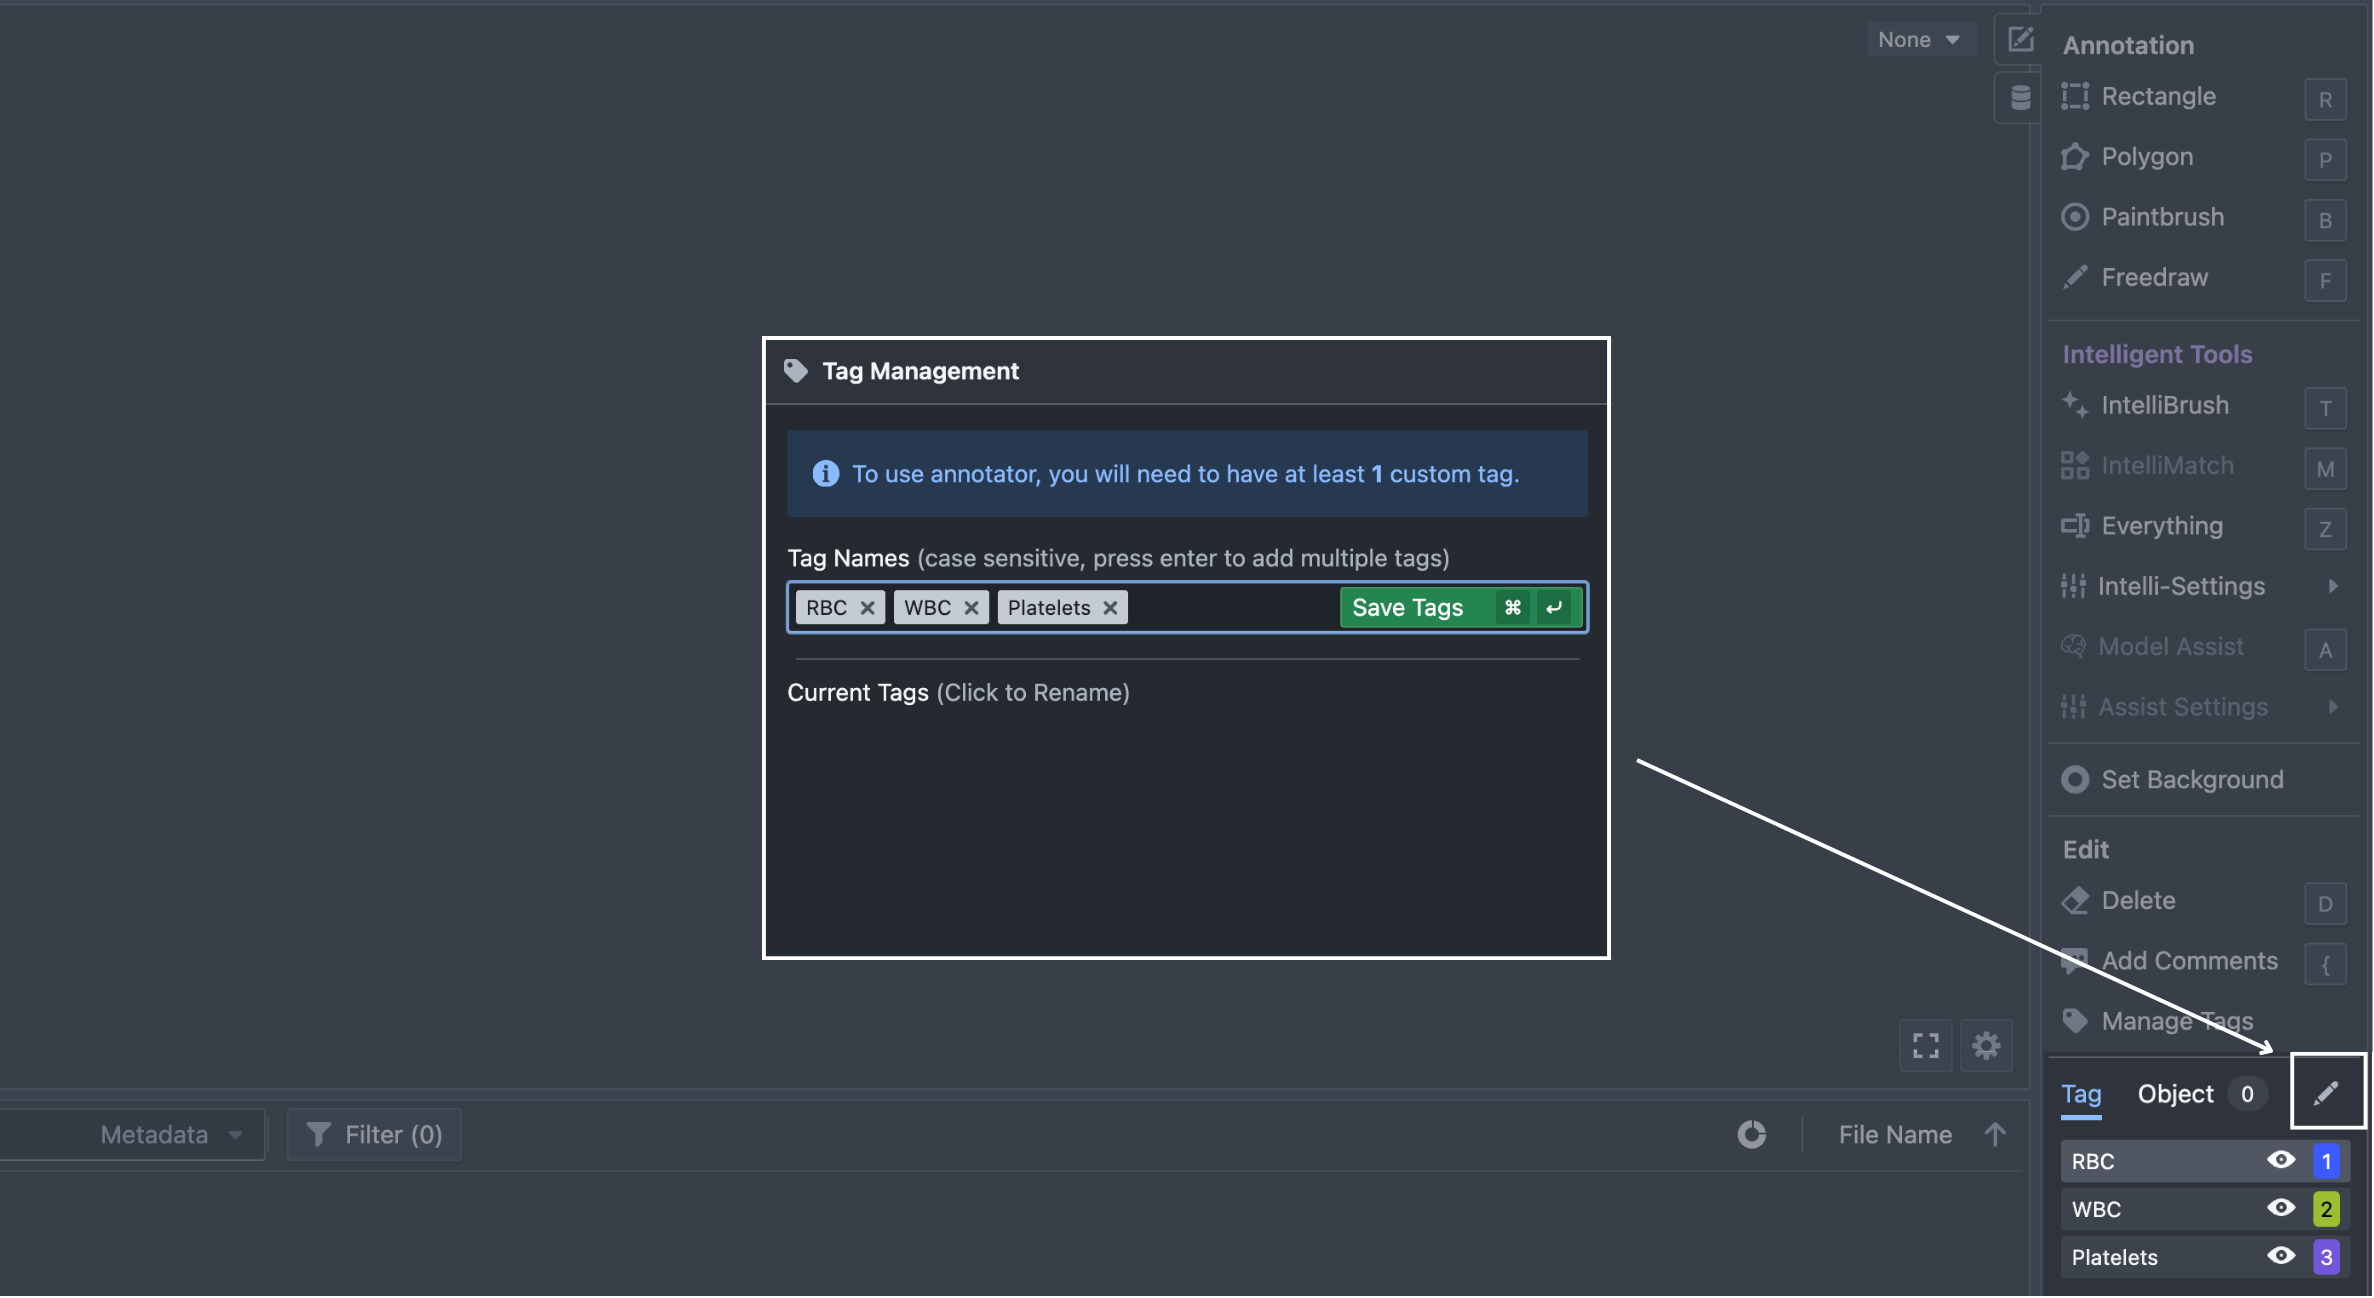
- Create Tags (First Time Setup)
- Tags are the objects you want to identify (like "white blood cells" in our example)
- Type each tag name and press Enter
- Save tags by clicking the green 'Save tags' button or press Cmd + Enter
- Note: You can always edit tags later in the bottom right corner. To filter data based on specific criteria, refer to Managing Tags.
- Start Labeling
- Select a tag from your list
- Choose 'Rectangle' tool from sidebar (or press 'R' key)
- Click and drag over objects in the image
- Each box you draw will be labeled with your selected tag
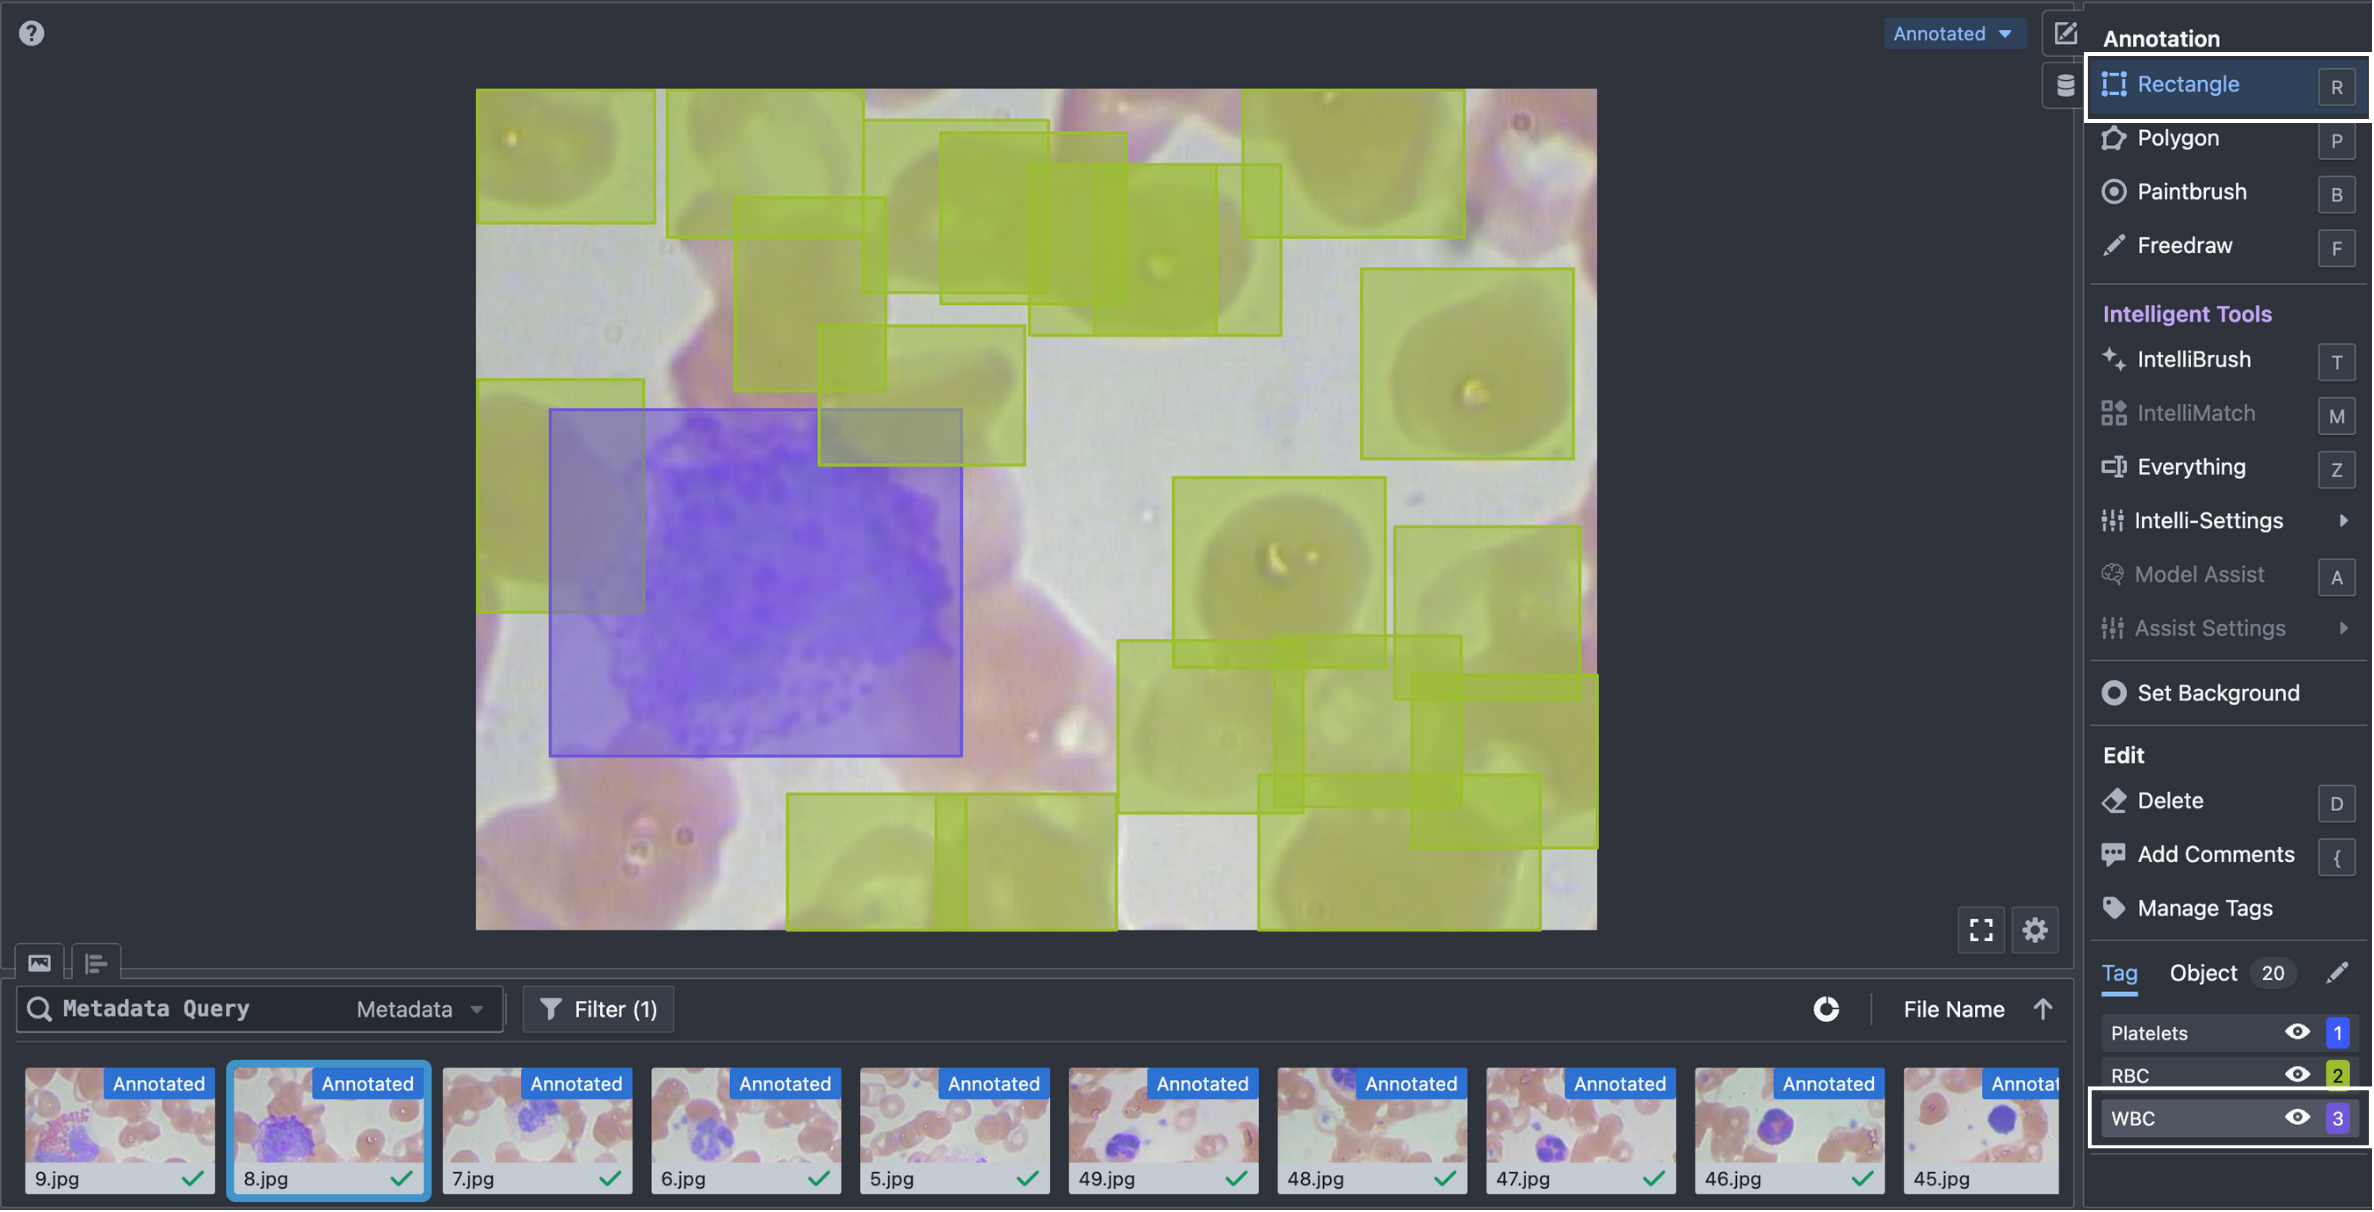
Think of it like putting sticky notes on parts of the image to tell the computer "This is what a white blood cell looks like" or "This is what a red blood cell looks like."
Read more about annotations here.
Step 5 - Train Your Model
After you've finished preparing your dataset, you can start training your model. Model training involves a few key steps:
- Create a Workflow
A workflow defines the process for training your model. It includes how you set up your dataset, augment data, and configure your model selection.
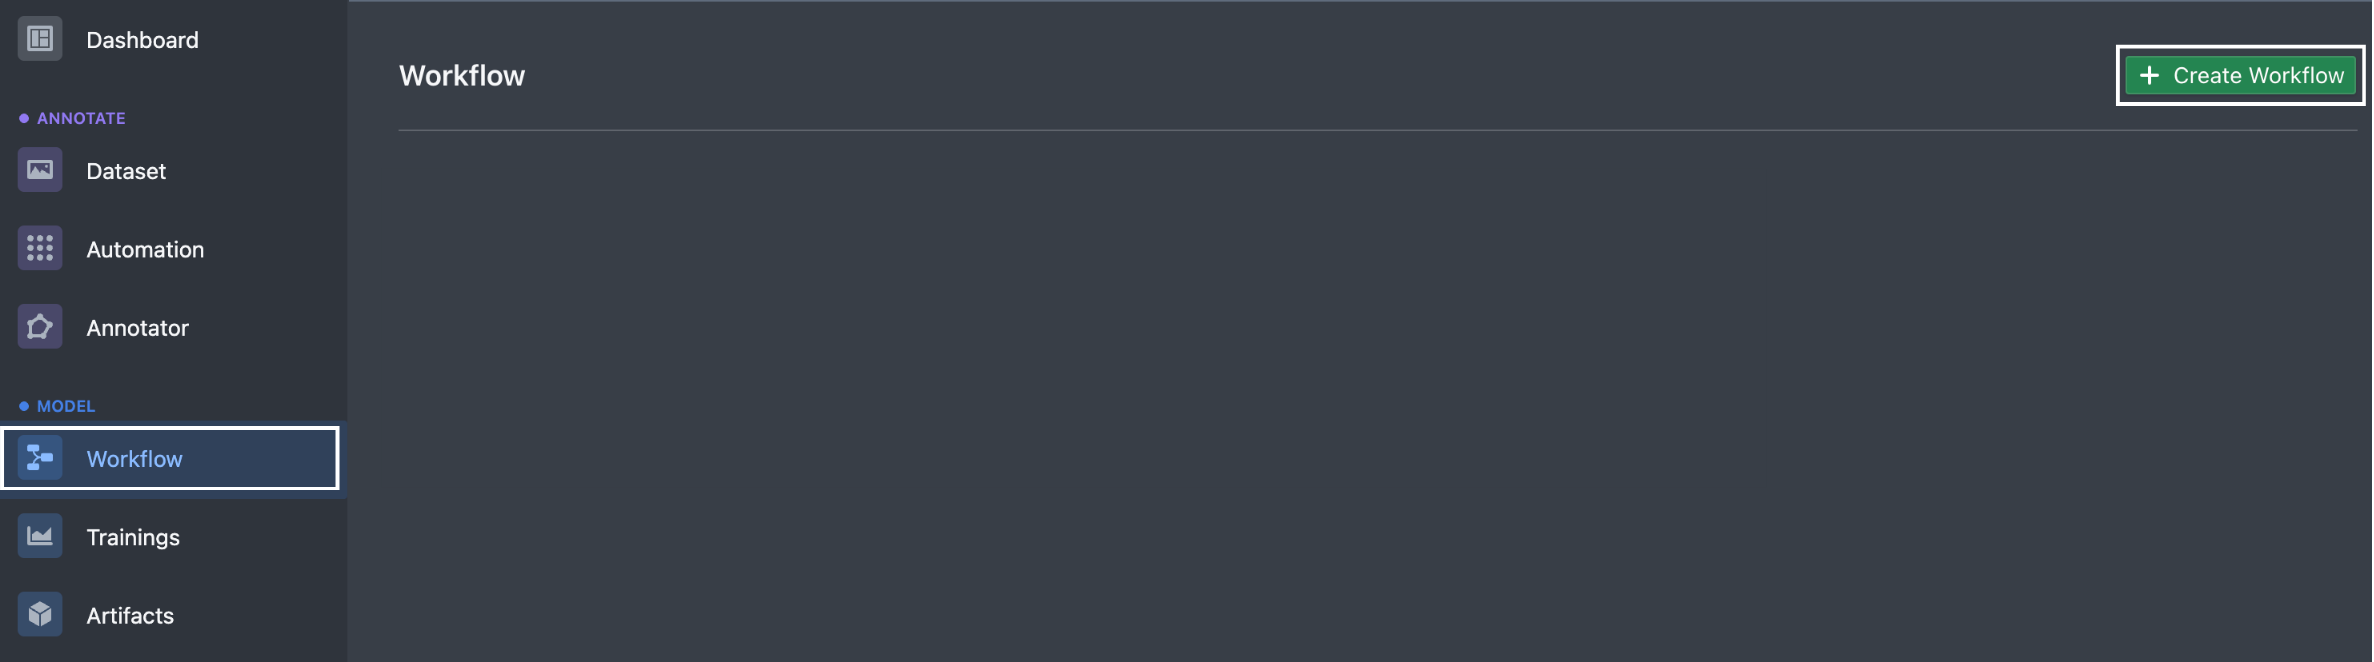
- Click "Workflow" in the left navigation bar of your project.
- Click the green "+ Create Workflow" button on the right. Rename "Untitled Workflow" by clicking on the text at the top left of the canvas.
-
For beginners, we recommend using our workflow recommendation engine. On the workflow recommendation dialog that appears, select the following and proceed to next steps:
- 'Object detection'
- 'Small model'
- 'Balanced performance'
- Click 'Build Model Workflow'
-
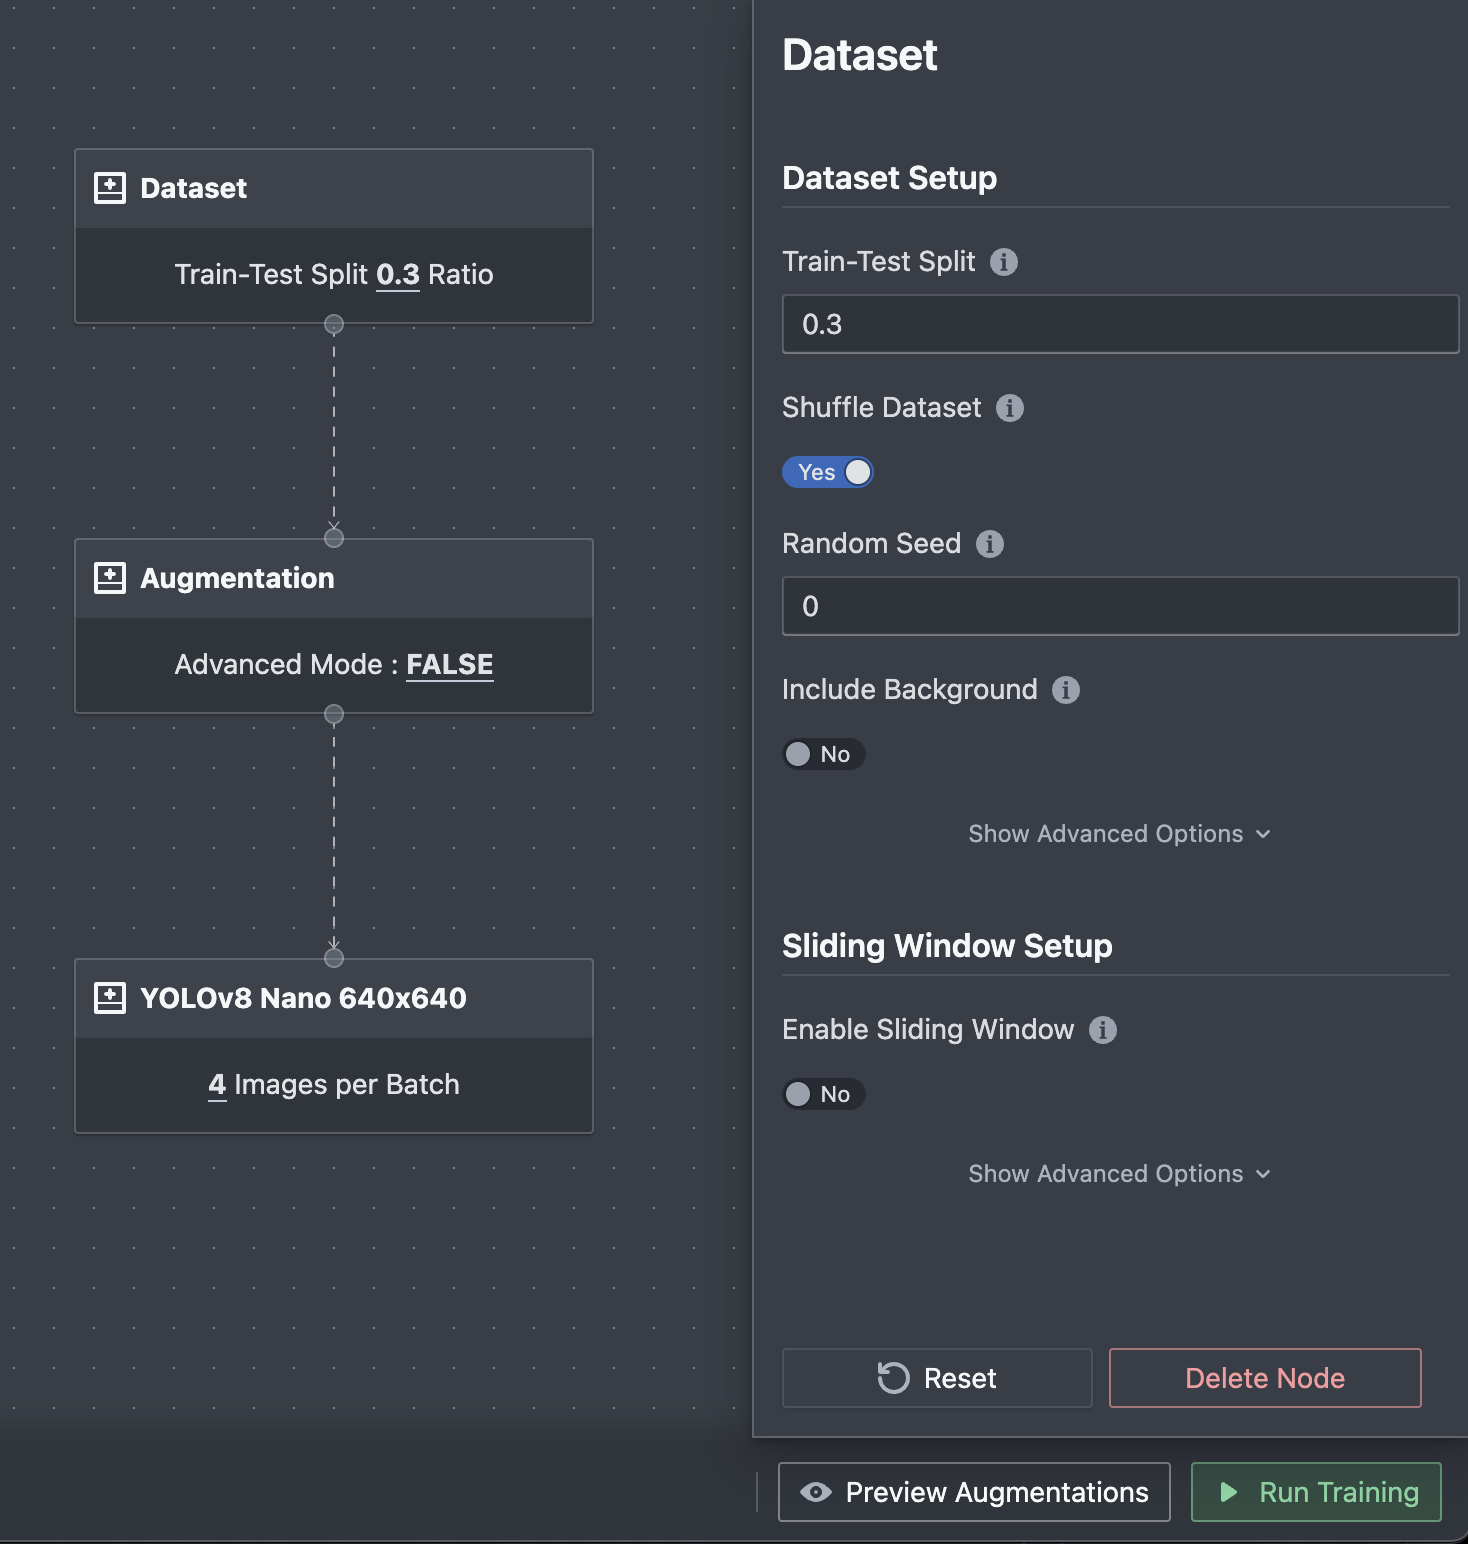
With the recommended workflow on the canvas, click each card (Dataset, Augmentation, Model) to customize the settings further.
- Run Your Training
- Next, click the 'Run Training' button at the bottom right corner.
- Choose your checkpoint strategy, type, and number of GPUs.
- Be mindful of your usage quota as training requires substantial computing resources. The usage multiplier indicates the resource consumption. Read more here.
- The training can take from a few minutes to a day, depending on your dataset size, model choice, and GPU configuration. An estimated training time will be shown before you start.
- After starting, you'll see an initialization period where resources are prepared. This may take a few minutes or longer based on your configuration.
- Monitor and Evaluate Performance
- After training starts to run, you can monitor your training process via the training page, which displays statuses, errors, and checkpoint evaluations. (Read more)
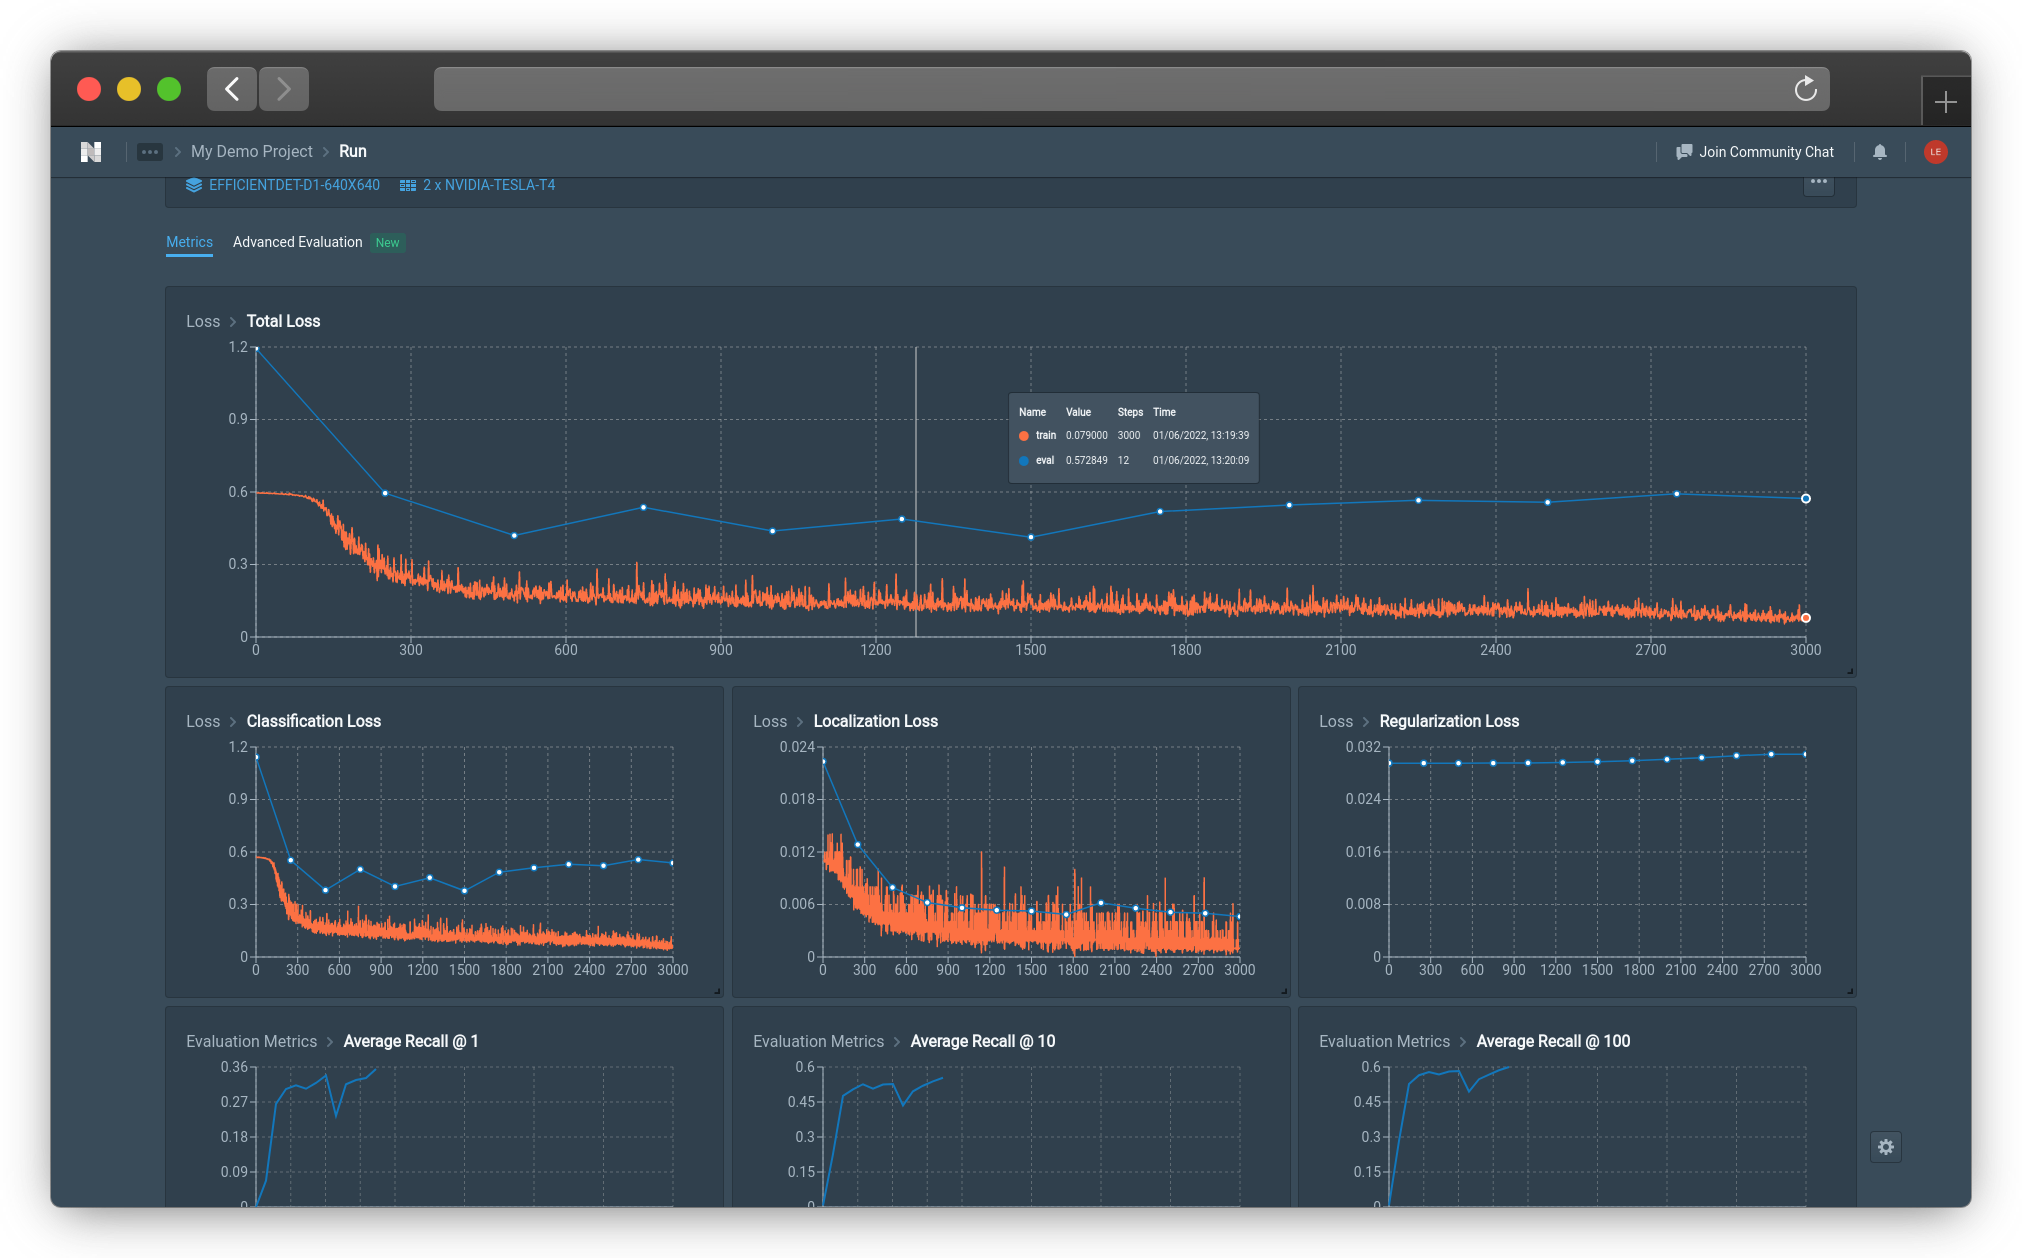
- You can understand performance metrics using the detailed dashboard. Refer to model performance evaluation and improvement guides for further insights.
By following these steps, you can effectively train your model and assess its performance, making necessary adjustments to optimize it further.
Step 6 - Access and Deploy Trained Model for Inferencing
Once you have trained a machine learning model, you can deploy it either in the cloud or on your own hardware to generate predictions. You can find the output of your training under "Artifact." Think of it as a snapshot of your model that contains all the important information needed to run predictions. Read more about artifacts here.
You have two ways to use your trained model:
Option 1: Export and Run Locally
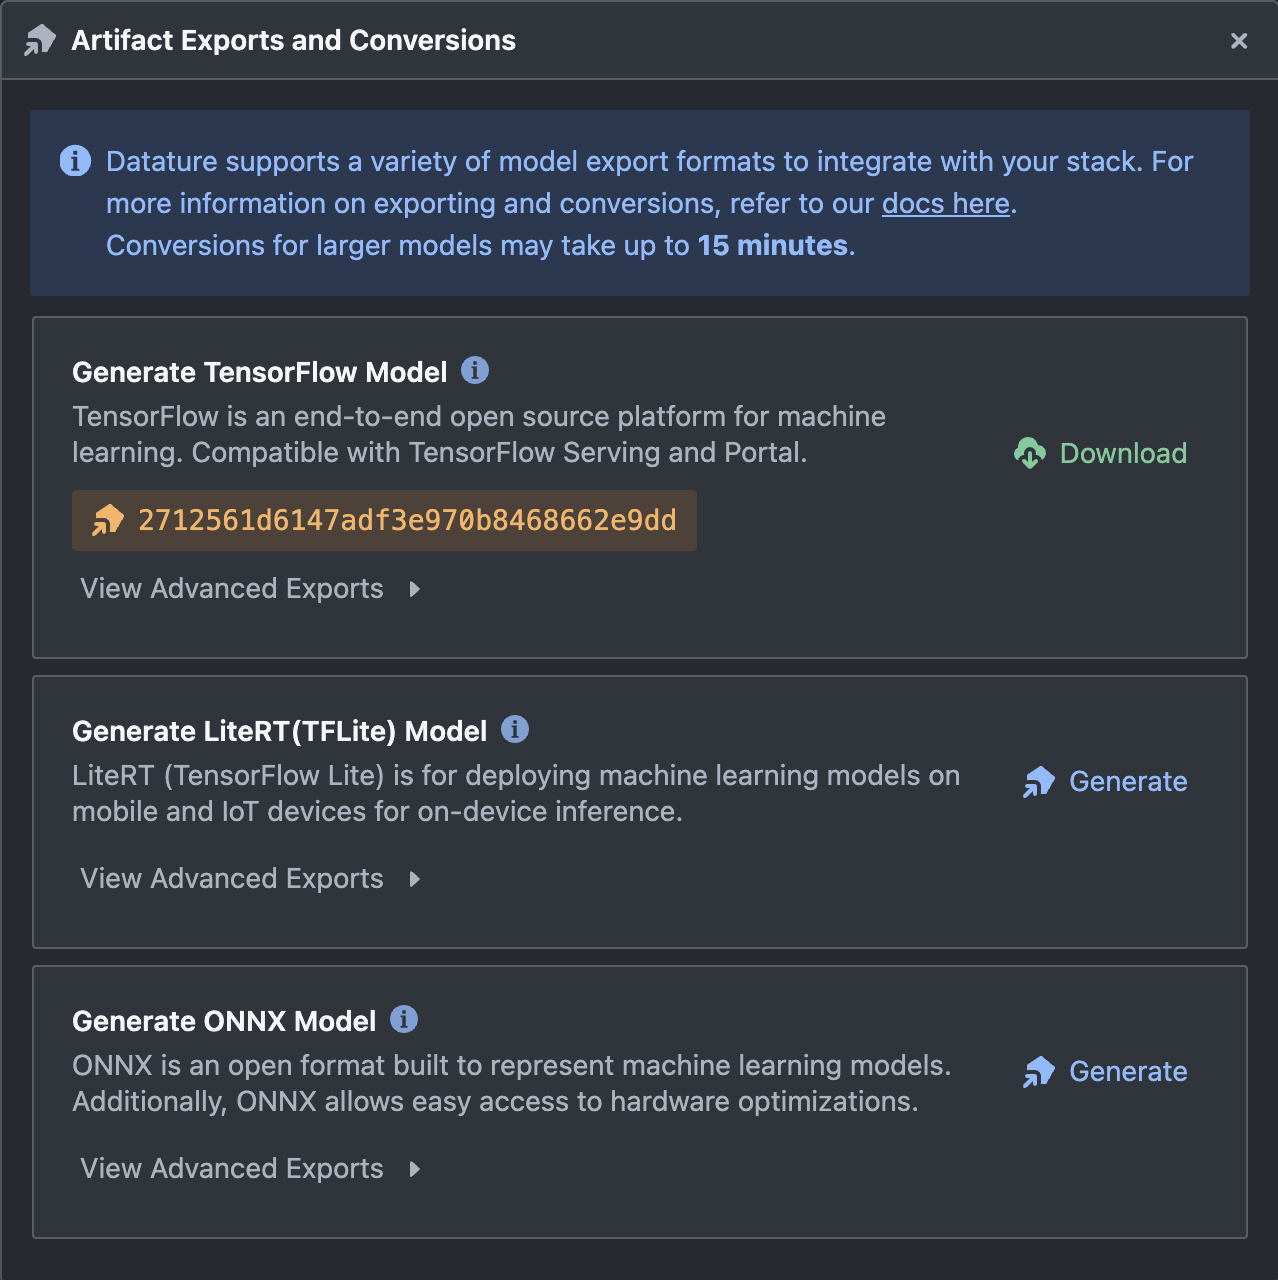
- Export Artifact: Click the three dots next to your artifact and select "Export Artifact."
- Choose Format: Select your preferred format and click "Generate."
- Download: Once the artifact is ready, download it to run predictions locally. A sample script is provided to help you test your model.
Option 2: Cloud Deployment (via API)
This option lets you run your model through Datature Cloud and offload the work needed to manage the infrastructure.
- Create Deployment: Click the three dots on your chosen artifact and select "Create Deployment."
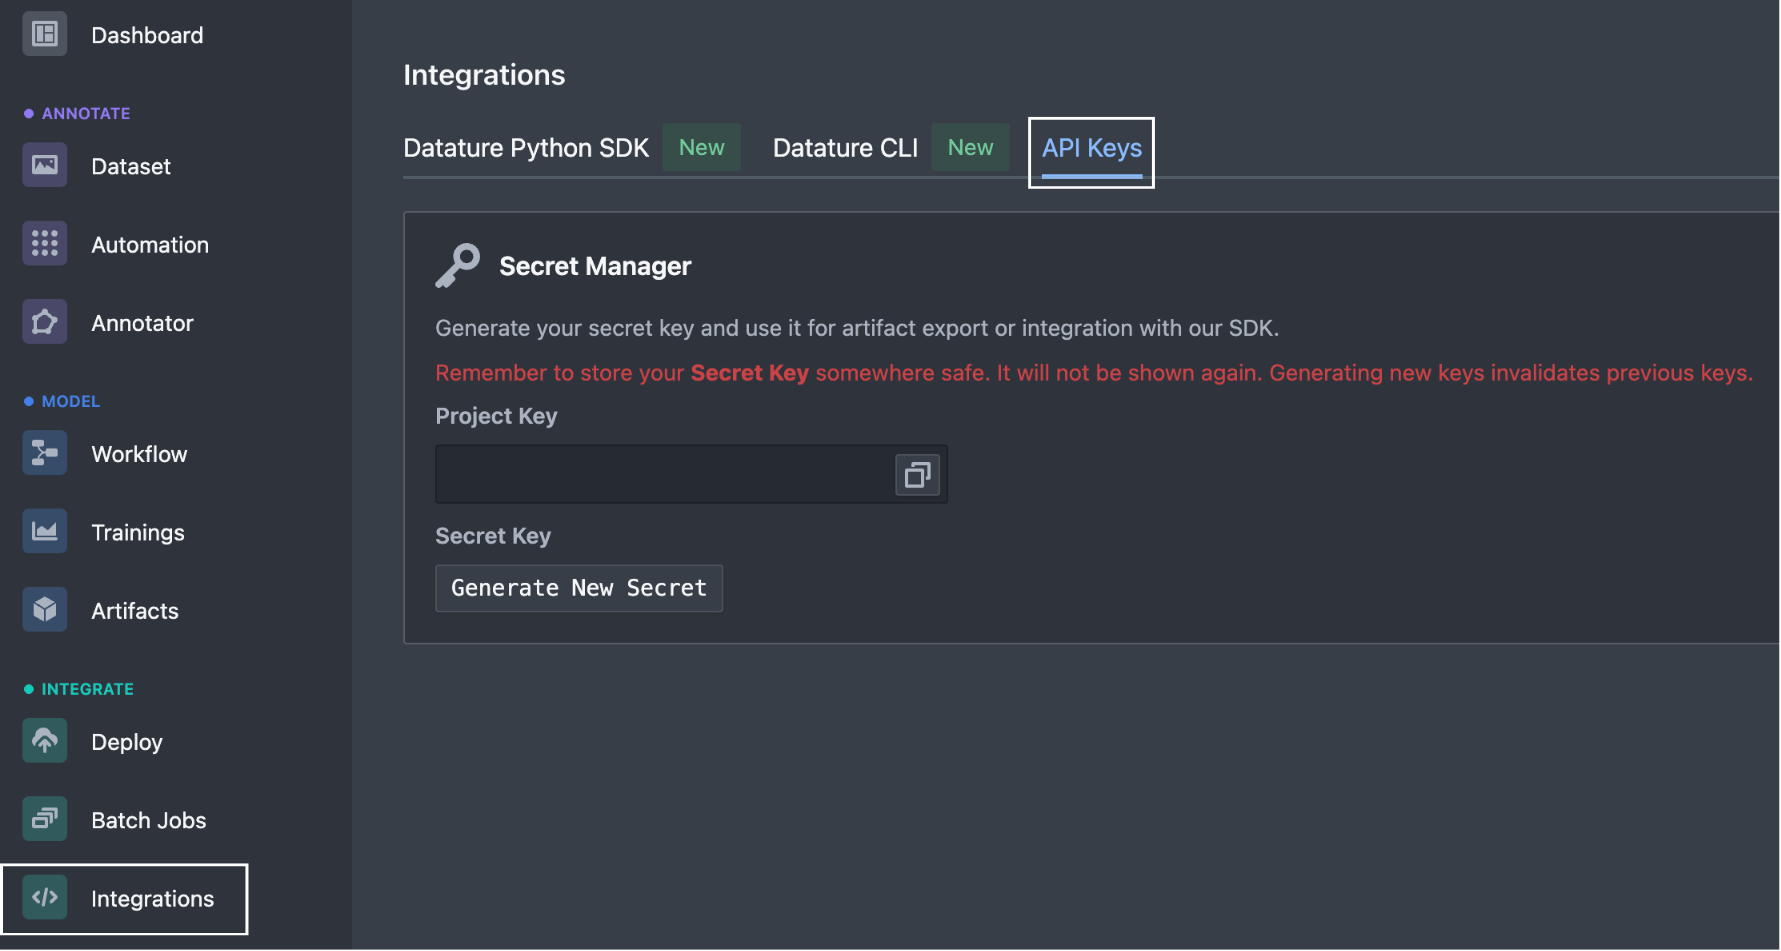
- Generate API Key: If this is your first deployment, you'll be prompted to create an API key. Follow the instructions on the integrations page and keep your key secure.
- Configure Deployment and Deploy: Set your preferred configuration for the deployment by following on-screen instructions and deploy.
Wait a few minutes for your hosted API to be ready and once it is up and running, you can use it to make predictions by providing the necessary input data.
Step 7 - Run inferencing (Final Step!)
Congratulations 🎉 you have made it so far! Your model is now deployed and ready to use!
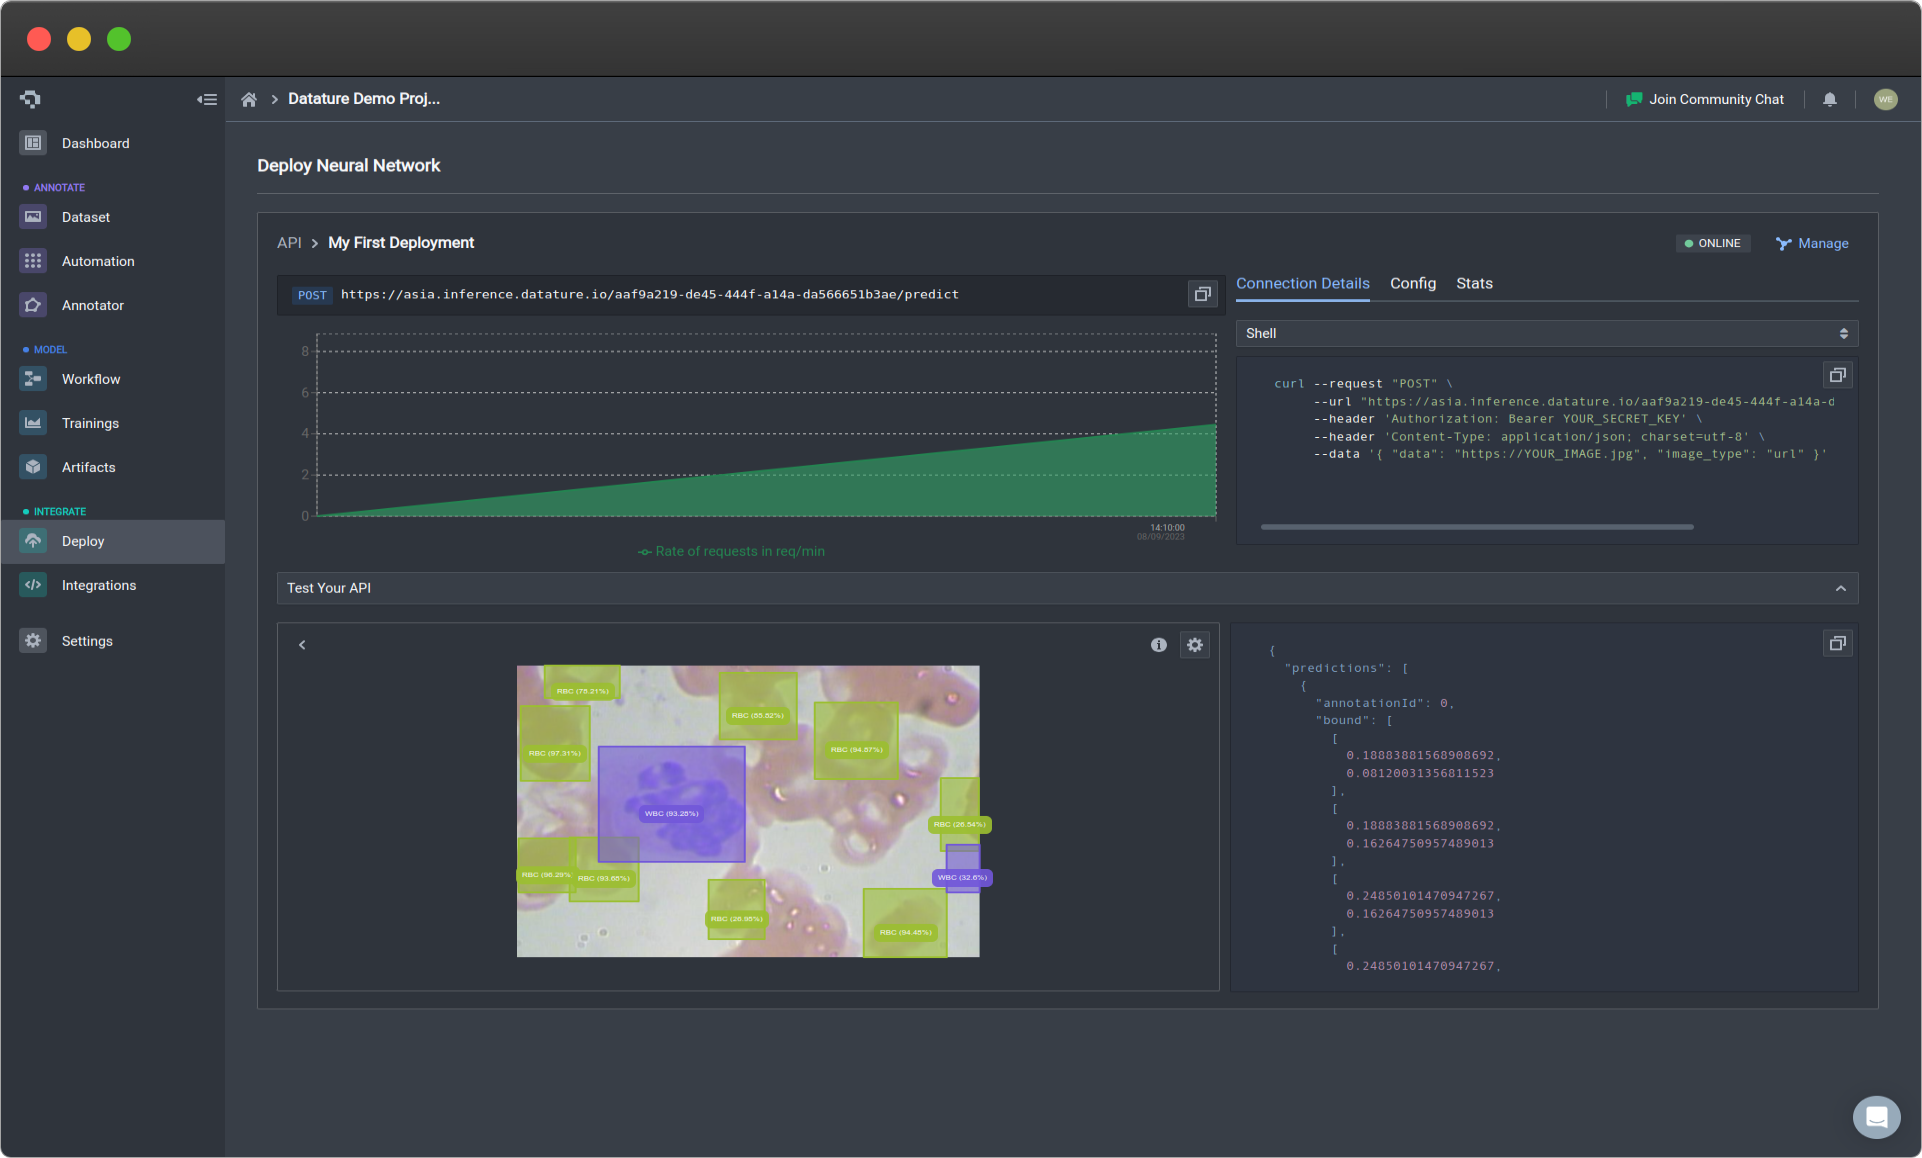
Testing Your API
- Test Your API Button: Go to the Evaluation tab and click on the "Test Your API" button.
- Upload an Image: You'll see a dropdown box where you can drag and drop an image to get a prediction.
- View Results: On the right, you'll see the JSON output that simulates what you receive when using the code. On the left, you can see a visualization of the image along with its predictions. This interactive feature helps you understand how the API functions and allows quick predictions for individual examples.
For a local testing experience, you can use our open-source Portal. This tool streamlines the inference testing process. Read more here.
Integration Into Your Projects
Ready to use the API in your applications? Datature provides ready-to-use code snippets in popular programming languages for easy integration.
You can find these code examples in the documentation to get started quickly with your preferred programming language. Read more here.
Common Questions
How do I get access to Datature's platform?
You will need an activated Datature account to get access to Datature's platform. Follow the instructions in Signing Up to create an account. Creating an account is free so you don't have to worry about payment while exploring what Datature has to offer. However, if you already know which plan is the most suitable for your projects, you can also choose the plan during the sign-up.
How do I log in to Datature's platform?
Once you have created and activated your Datature account, you can log in via datature.io or nexus.datature.io. For more details, refer to Logging In.
What plans do you offer and which is the most suitable for my project?
Datature supports users from various backgrounds - whether it be individuals curious about experimenting with computer vision (Starter, Starter+), machine learning engineers, students, and researchers trying to build computer vision models more efficiently (Developer, Developer+), startups, labs, and companies seeking for a fast and cost-effective way to build their products (Professional, Professional+), or enterprises looking to leverage AI to grow their businesses (Enterprise) - our plans and features are curated to meet project requirements at different scales.
Check out Plans and Pricing to see the different options. If you have already started a Datature project, you can also check your Usage and Quota to see what options would be the most appropriate for your project.
How do I upgrade my account or get more features?
If your project requires more image quota, GPU training minutes, training checkpoints, and support than our free Starter plan offers, consider upgrading your account to a paid plan to enjoy more features. If you have complex shapes to annotate, you may want to upgrade to one of our plus plans which comes with the IntelliBrush add-on.
I am a student. Can I get any discount?
Yes, we are thrilled to support the education community in building a better future. We offer an education discount to students, educators, and researchers. Contact Us for an exclusive 20% off all paid plans!
How do I start building my first model?
Signed up , chose a plan, and successfully logged in to your account? You are all set to start building your first model with us. Head to Building Your First Model to learn how to build a computer vision model with Datature!
Where can I get help if I encounter an issue while using the platform?
Reach out to us via one of the contact methods in Contact Us!
👋 Need help? Contact us via website or email
🚀 Join our Slack Community
💻 For more resources: Blog | GitHub | Tutorial Page
🛠️ Need Technical Assistance? Connect with Datature Experts or chat with us via the chat button below 👇
Updated 7 months ago