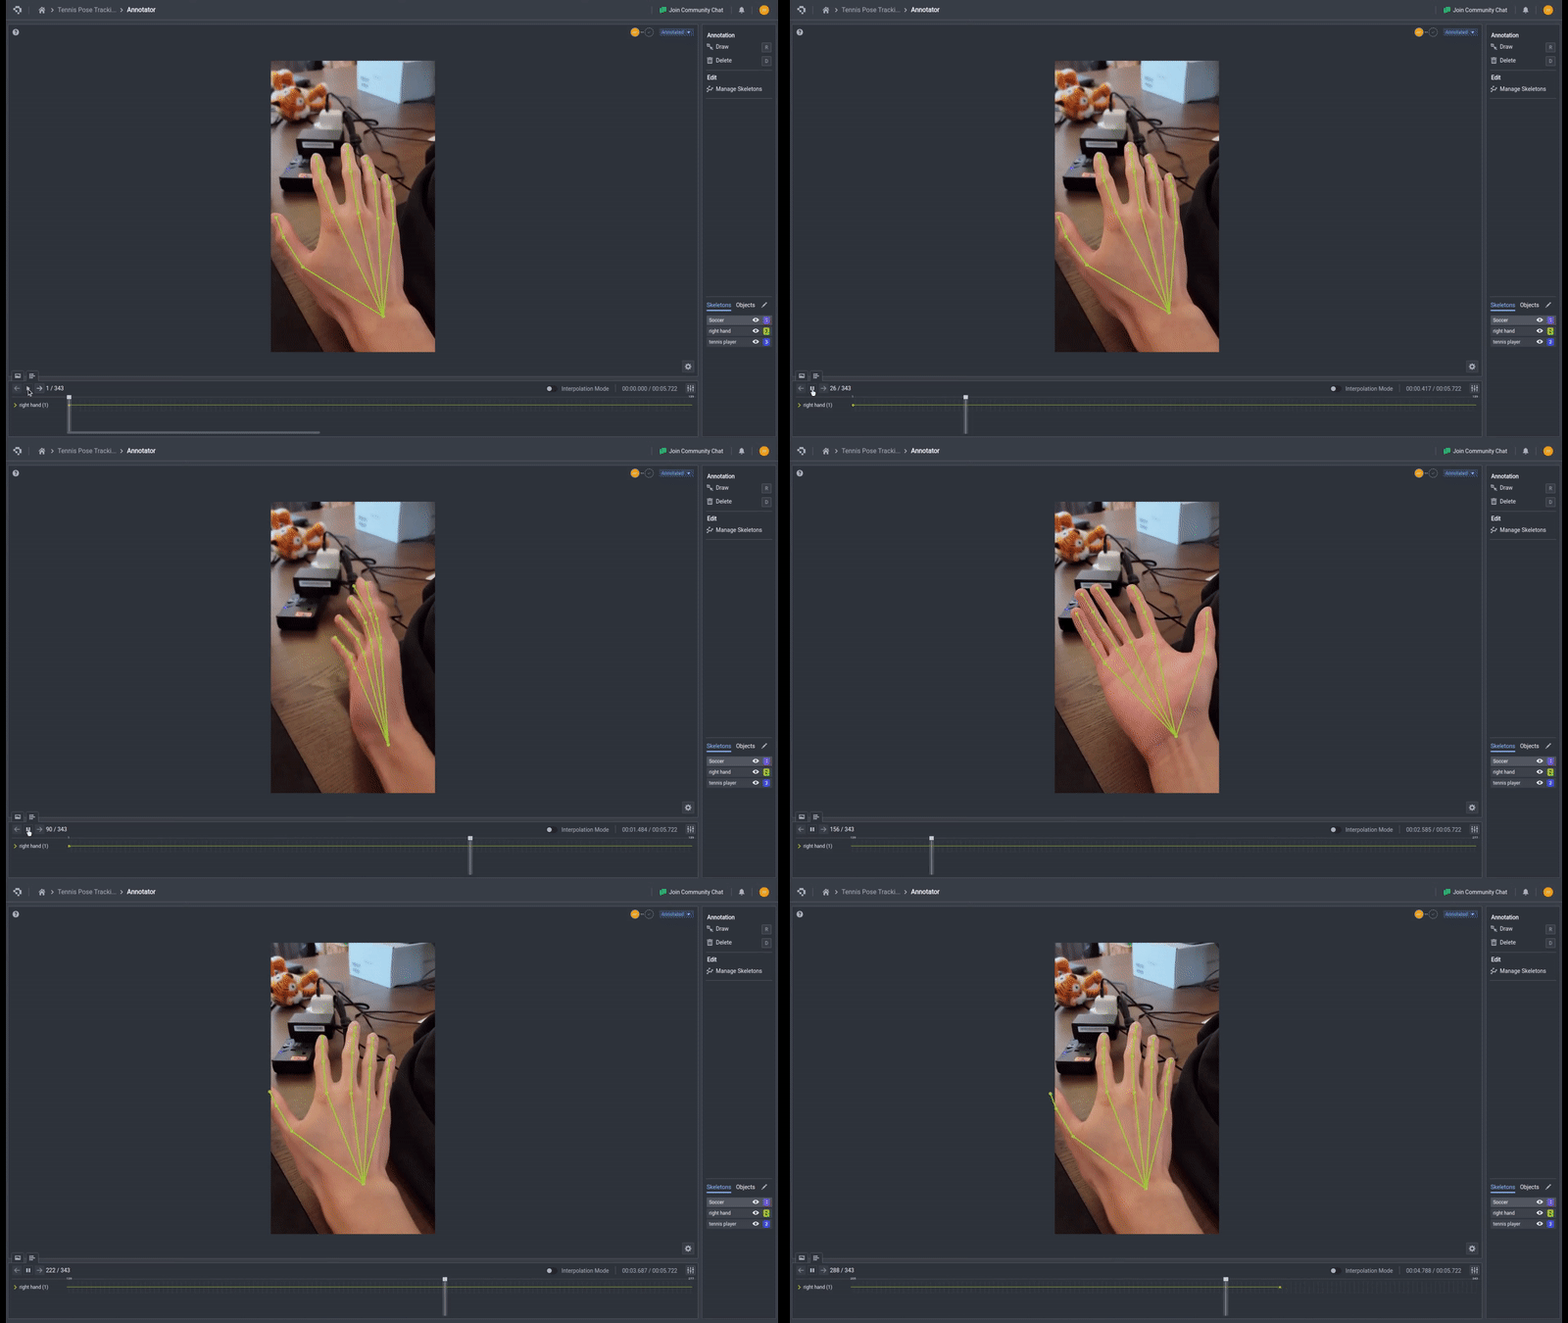
Video Interpolation
Video Recap
- On the Annotator, select Interpolation Mode - When the toggle is switched on, users’ manual annotations will operate as keyframes that will help make predictive annotations on other frames.
- Make an annotation with any of the annotation tools available on the platform on a frame - This will construct a keyframe annotation, which will be indicated on the video bar as a diamond shape.
- Make a second annotation on another frame for the same object - This will automatically interpolate annotations on the frames between the two keyframe annotations.
- To adjust the interpolated annotations or add more, simply make another annotation on another frame - The interpolated annotations will use the two nearest bounding keyframes as the reference for the interpolation.
- Once you are happy with the annotations and do not wish to keep refining, you can commit the annotations!
What is Video Interpolation?
Video annotation interpolation techniques are precisely designed to utilize the similarity of visual features between frames to efficiently construct annotations based on just a couple manual annotations. Overall, our tools were designed to provide annotation suggestions in other frames based on a user’s manual annotation. Additionally, as we understand that users and use-cases all require various levels of annotation accuracy, the tools are designed to help users improve the quality of the predictive annotations with additional annotations.
Broadly speaking, video interpolation techniques can be split into computer vision model-based and model-free approaches. Model-free approaches use the manual annotation polygon coordinates to construct a mathematical interpolation for polygons in the frames in between the start and end frames. Model-based approaches utilize the power of machine learning based computer vision models to extract features within the manual annotations and search for similar features in the other frames to automatedly produce annotations. Model-free approaches are generally quite computationally cheap, while model-based approaches will have some level of computational overhead but are much more capable of analyzing the visual features for better predictions.
Model-free interpolation can be considered as a practical context for polygon morphing, a topic that is very common in graphics. As the goal of interpolation in our case is to produce polygons that most easily represent the changing of object shapes from a view over time, our goal with our interpolation tool was to reduce visual anomalies and frequent, large changes in polygon shape throughout the interpolation.
What is Linear Interpolation?
Linear interpolation starts with annotations in the beginning and end frames. The first consideration was what type of interpolation method to use. This determines how the polygon’s trajectory and general location evolves over the frames. Regression and interpolation techniques can span from the simplest forms like linear interpolation to B-splines and more. While techniques with greater complexity are more capable of fitting to complex movements, like larger curved motions, they don’t always prove to be very intuitive with the simple changes. As such, to make the user experience more transparent and simplified, we’ve opted for linear interpolation, as this will allow users to precisely understand how their inputs affect the interpolated polygons created.
The second significant part of the interpolation process is how the overall shape of the polygon transforms throughout the interpolation process. For reducing the chances of numerous unwanted visual artifacts, we have opted for an algorithm that minimizes drastic alterations as much as possible. As such, while the tool is less suited for easily mapping to extreme movements and drastic transformations, additional interpolation points can be used to improve the predicted polygons. To refine and improve the interpolated masks, users can input manual annotations in between the initially inputted annotated frames, which will then re-interpolate the masks but only between the nearest frames. Overall, our approach is conservative and simple by design, to allow users to have an easily editable and intuitive user experience when using our interpolation tool.
Video Interpolation Capabilities
Linear interpolation supports as many keyframes as is necessary to satisfactorily create the quality needed. It helps to interpolate between one object to another. Thus, artifacts that are created will not be kept, and only the largest objects are saved as the interpolated version. The interpolation supports bounding boxes, masks and keypoints, so users can freely interpolate so long as they are of the same type.

Keypoint interpolation (click image to enlarge)
Common Questions
What information is being used when interpolating between frames?
The interpolation technique uses the two nearest bounding frames that act as the lower and upper bound for the frame in question, so to improve the quality of your interpolated polygons in certain frames, you should add keyframes that are nearer to those frames than previous keyframes.
👋 Need help? Contact us via website or email
🚀 Join our Slack Community
💻 For more resources: Blog | GitHub | Tutorial Page
🛠️ Need Technical Assistance? Connect with Datature Experts or chat with us via the chat button below 👇
Updated 5 months ago