
Annotation Automation
Video Recap
- Go to Automation - The Automation page can be found on the sidebar on your respective project.
- Duplicate the Existing Workflow - You can duplicate by selecting the Actions dropdown and duplicating.
- Create Your Own Workflow - You can drag the various blocks and connect them to your specifications with the following blocks: Dataset, To Annotate, Trigger, Consensus, To Review, and Completed.
- Activate Your Workflow - You can click the green Activate button to activate your new workflow.
How to Collaborate on Annotations?
Annotation Automation is a tool that helps teams to streamline their annotation workflow by automating the labelling process. It provides a platform for teams to manage annotation projects, assign tasks to annotators, track progress, and ensure annotation quality control.
Annotation Automation minimises any wasted annotation time by allowing project owners to assign specific asset groups to each annotator. Every annotator will only see the assets that they have been assigned to annotate. This reduces clutter for large datasets on Nexus and provides better task clarity.
Annotation Automation improves annotation accuracy and consistency by allowing project owners to rope in reviewers to assess both the annotation progress and the quality of the annotations. This gives rise to a feedback loop where reviewers and annotators work together to ensure that the dataset is labelled both efficiently and accurately.
As Annotation Automation is designed for larger teams, this feature is available for the Professional Tier. To learn more about our plans, go to Plans and Pricing.
Making Your Own Custom Annotation Workflow
In the Automation tab, you will see a default annotation workflow. This provides a simple, read-only template to guide new users. It consists of three simple blocks:
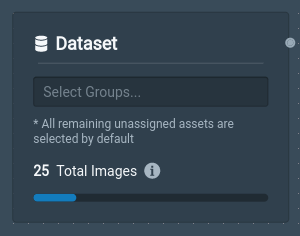
- Dataset: Selects the entire project dataset by default.
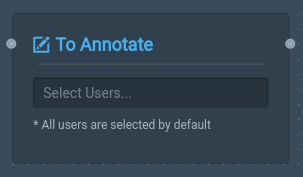
- To Annotate: All collaborators are selected to annotate the dataset by default.
- Completed: Provides confirmation that all assets have been acceptably annotated and is ready to be fed into a model for training.
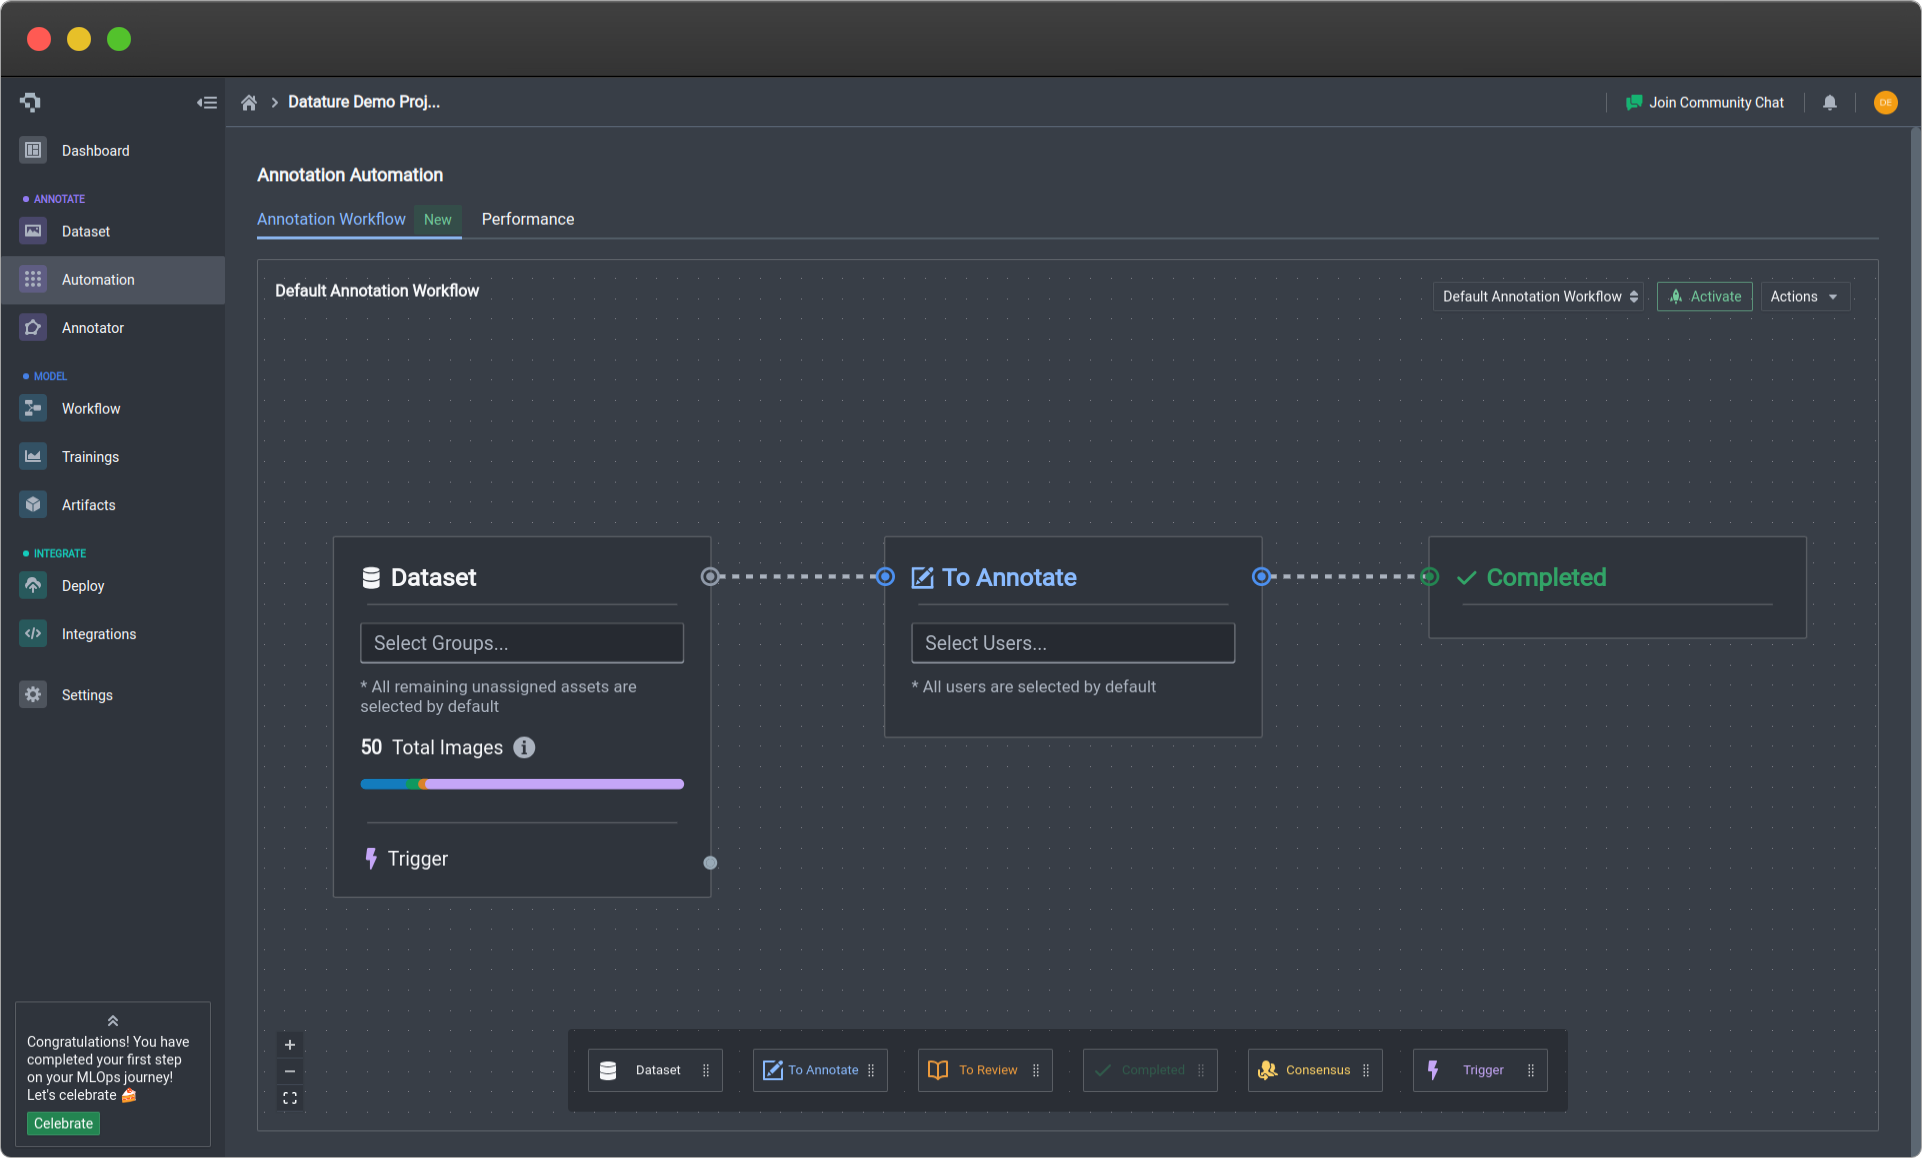
Default Annotation Workflow (click image to enlarge)
The linearity of the default workflow works if you have a small dataset that requires only one person to annotate. However, if your project contains a huge number of assets, or if there are multiple complex-shaped objects for each asset, you may want to invite multiple collaborators into the project to divide the annotation workload. Hence, we can customise the automation workflow to cater to this need.
To start, select Actions at the upper left corner and select Duplicate Workflow. This will duplicate the default workflow and create an editable copy, from which you can now add and manipulate blocks and their connections.
In the Dataset block, you can assign which asset groups should be annotated using Asset Group Management, which is a useful tool for filtering and segmenting your dataset on Nexus. An example of that can be shown in the following workflow.

Annotation workflow with assigned asset group in Dataset block (click image to enlarge)
If you wish to include reviewers to ensure annotation quality, you can insert a To Review block after the To Annotate block and assign certain users to take on a reviewer role. You can also decide how to handle cases regarding the approval or rejection of annotations. In this example, there is only one review stage, where the rejected annotations are sent back for re-annotation, while the approved annotations are marked as completed. Of course, you can include multiple stages of reviews or have separate annotator groups for re-annotation depending on your needs and the size of your team.
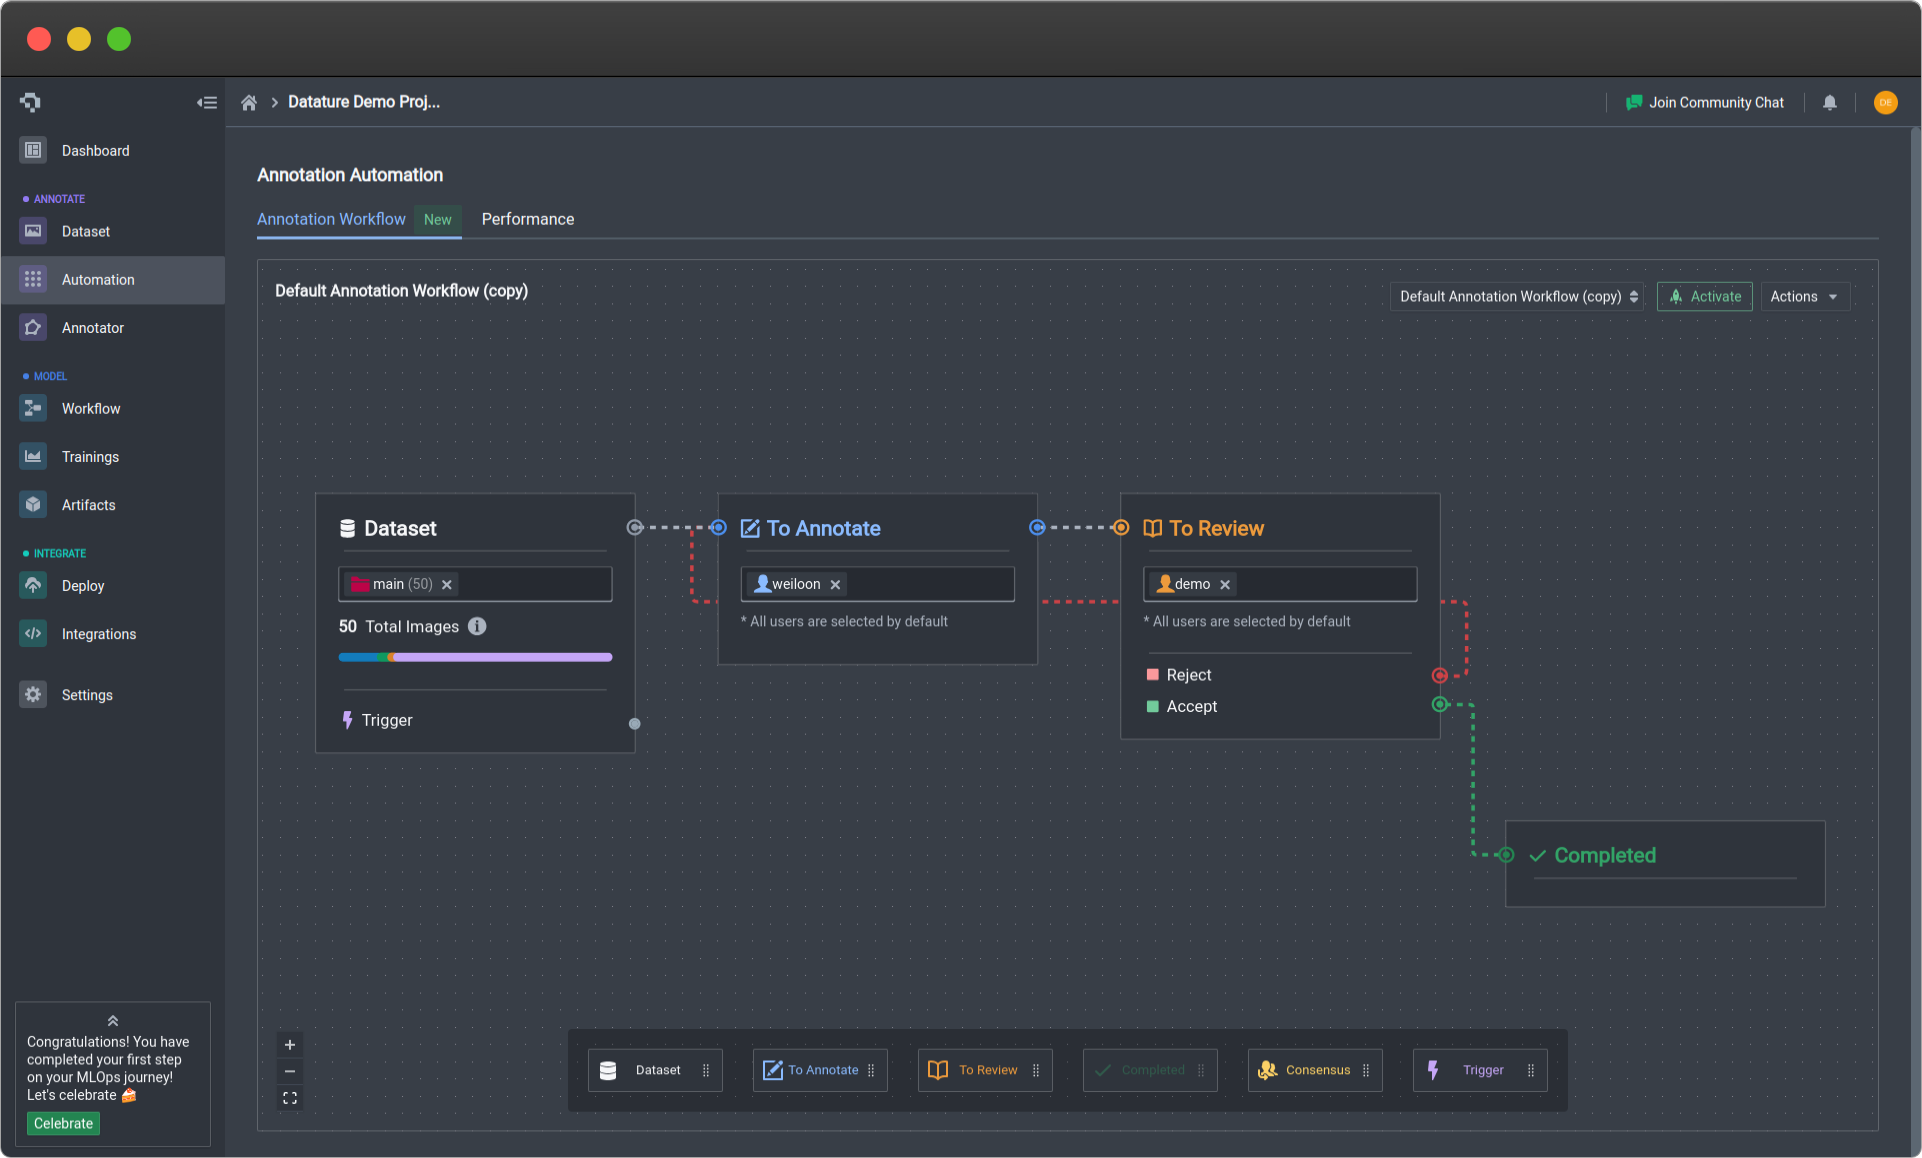
Added To Review block with rejected images looping back for re-annotation and accepted annotations going to completion (click on image to enlarge)
If you have divided your dataset into asset groups based on a certain criteria, you can divide the annotation workload by creating parallel workflows, each with their own annotators and reviewers who work independently on a subset of the dataset. Ultimately, the workflows should all connect to a single Completed block at the end.
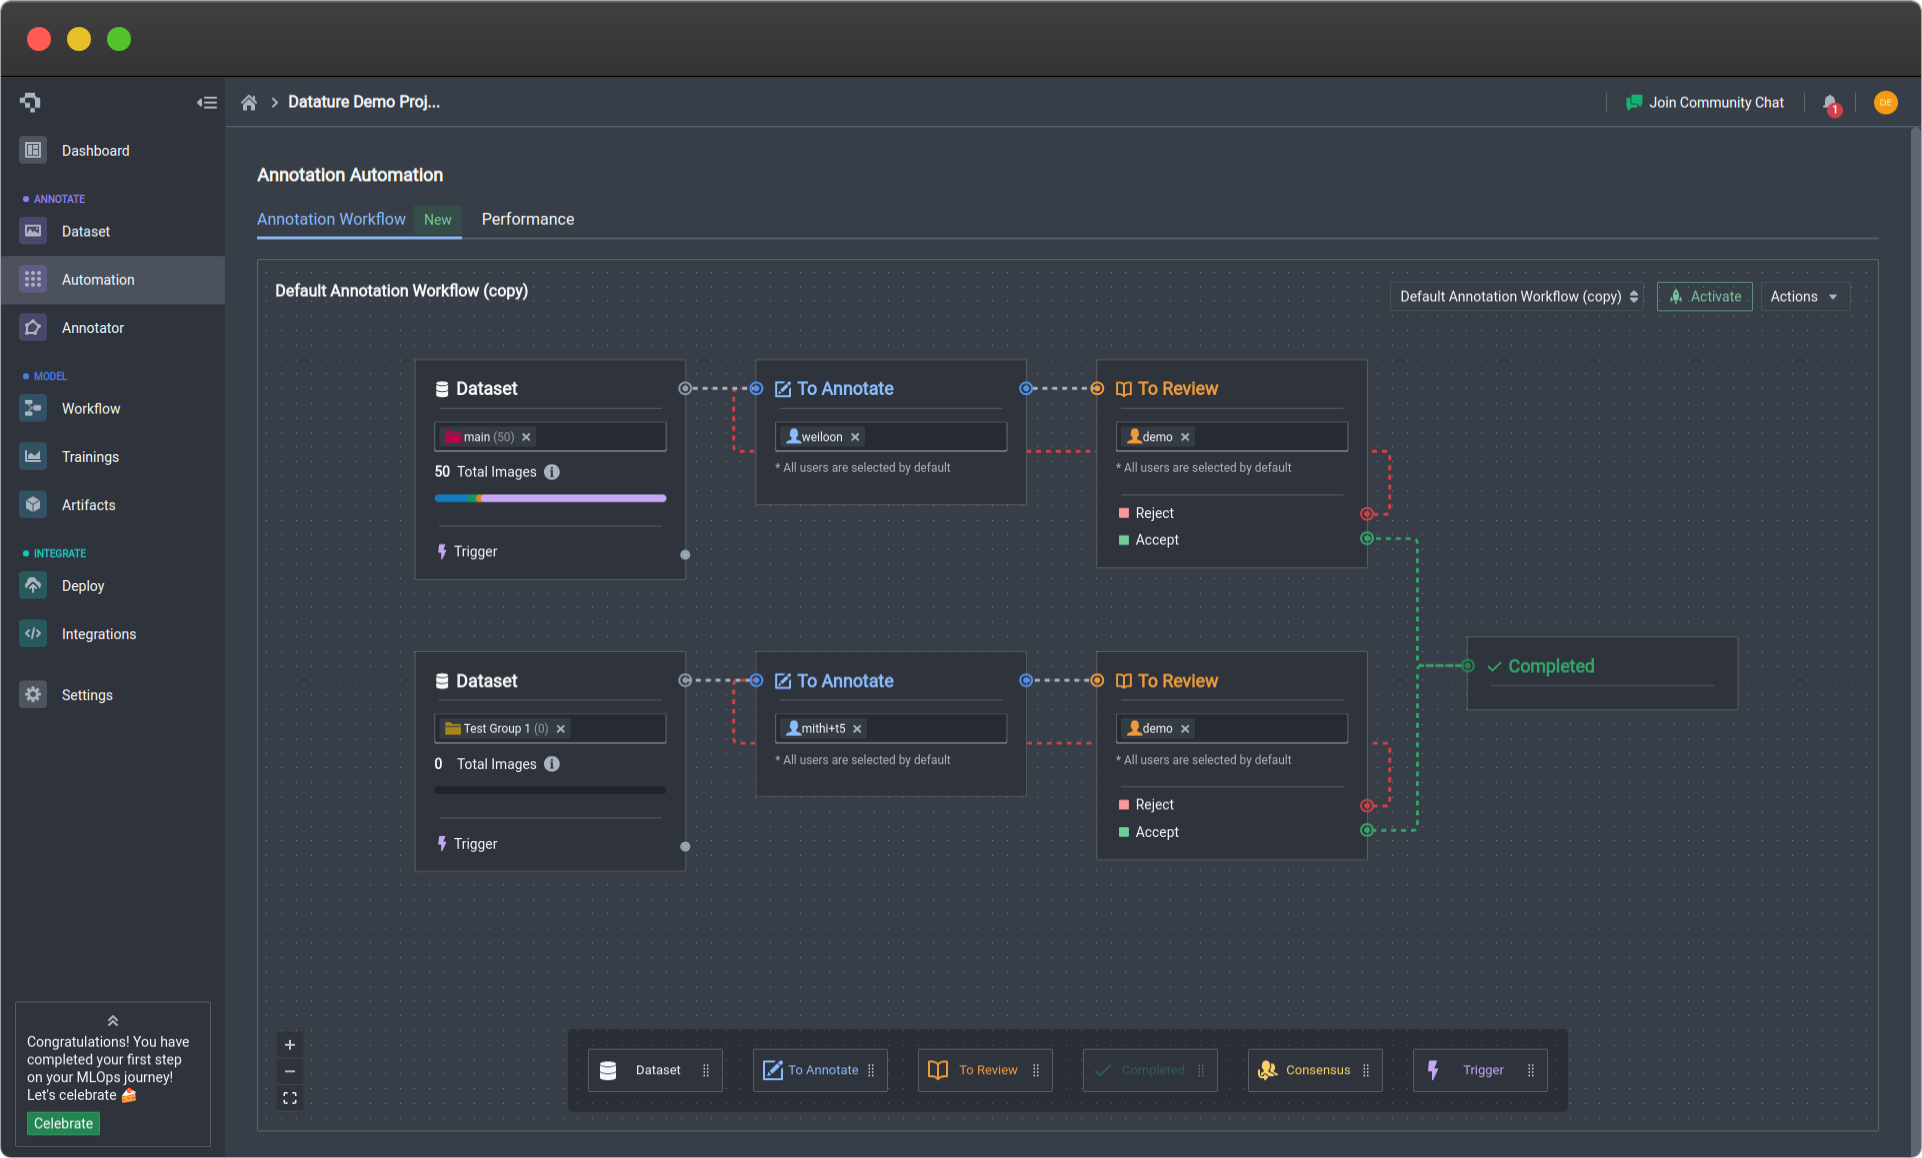
Example of parallel annotation workflows to demonstrate uncapped level of complexity (click on image to enlarge)
Once you are happy with your workflow, you can choose to use this workflow by selecting the green Activate button at the top right corner. This will make your workflow read-only. If you would like to activate a different workflow that you have created, you can always navigate through your other workflows in the dropdown menu next to the Activate button.
Your activated workflow will be read-only once activated so as to preserve the functionality of the workflow for the rest of your collaborators, so as to preserve the functionality of the workflow for the rest of your collaborators. To change your workflow, please duplicate the workflow and edit that one instead.
How Does This Impact the Annotation Experience?
For annotators with a set workflow, they will see something like the screenshot below, in which they can make annotations, and then confirm their annotations for submission to the next step. In the Annotator page, annotators will only see the assets that they have been assigned to annotate, as the asset bar below is automatically filtered for assets assigned to the user. This can be helpful if your dataset is large, so annotators do not have to scroll through irrelevant assets. If needed, annotators can further use the Filter button to select specific asset groups to manually filter the annotations.
Annotators can make as many annotations as they feel are necessary. As long as an asset contains at least one annotation, it will be automatically marked with an Annotated status, but the status can also be manually changed. If the annotator has finished annotating the asset, they can submit the asset for review either by selecting the Submit button or pressing K. This marks the asset with a Review status.
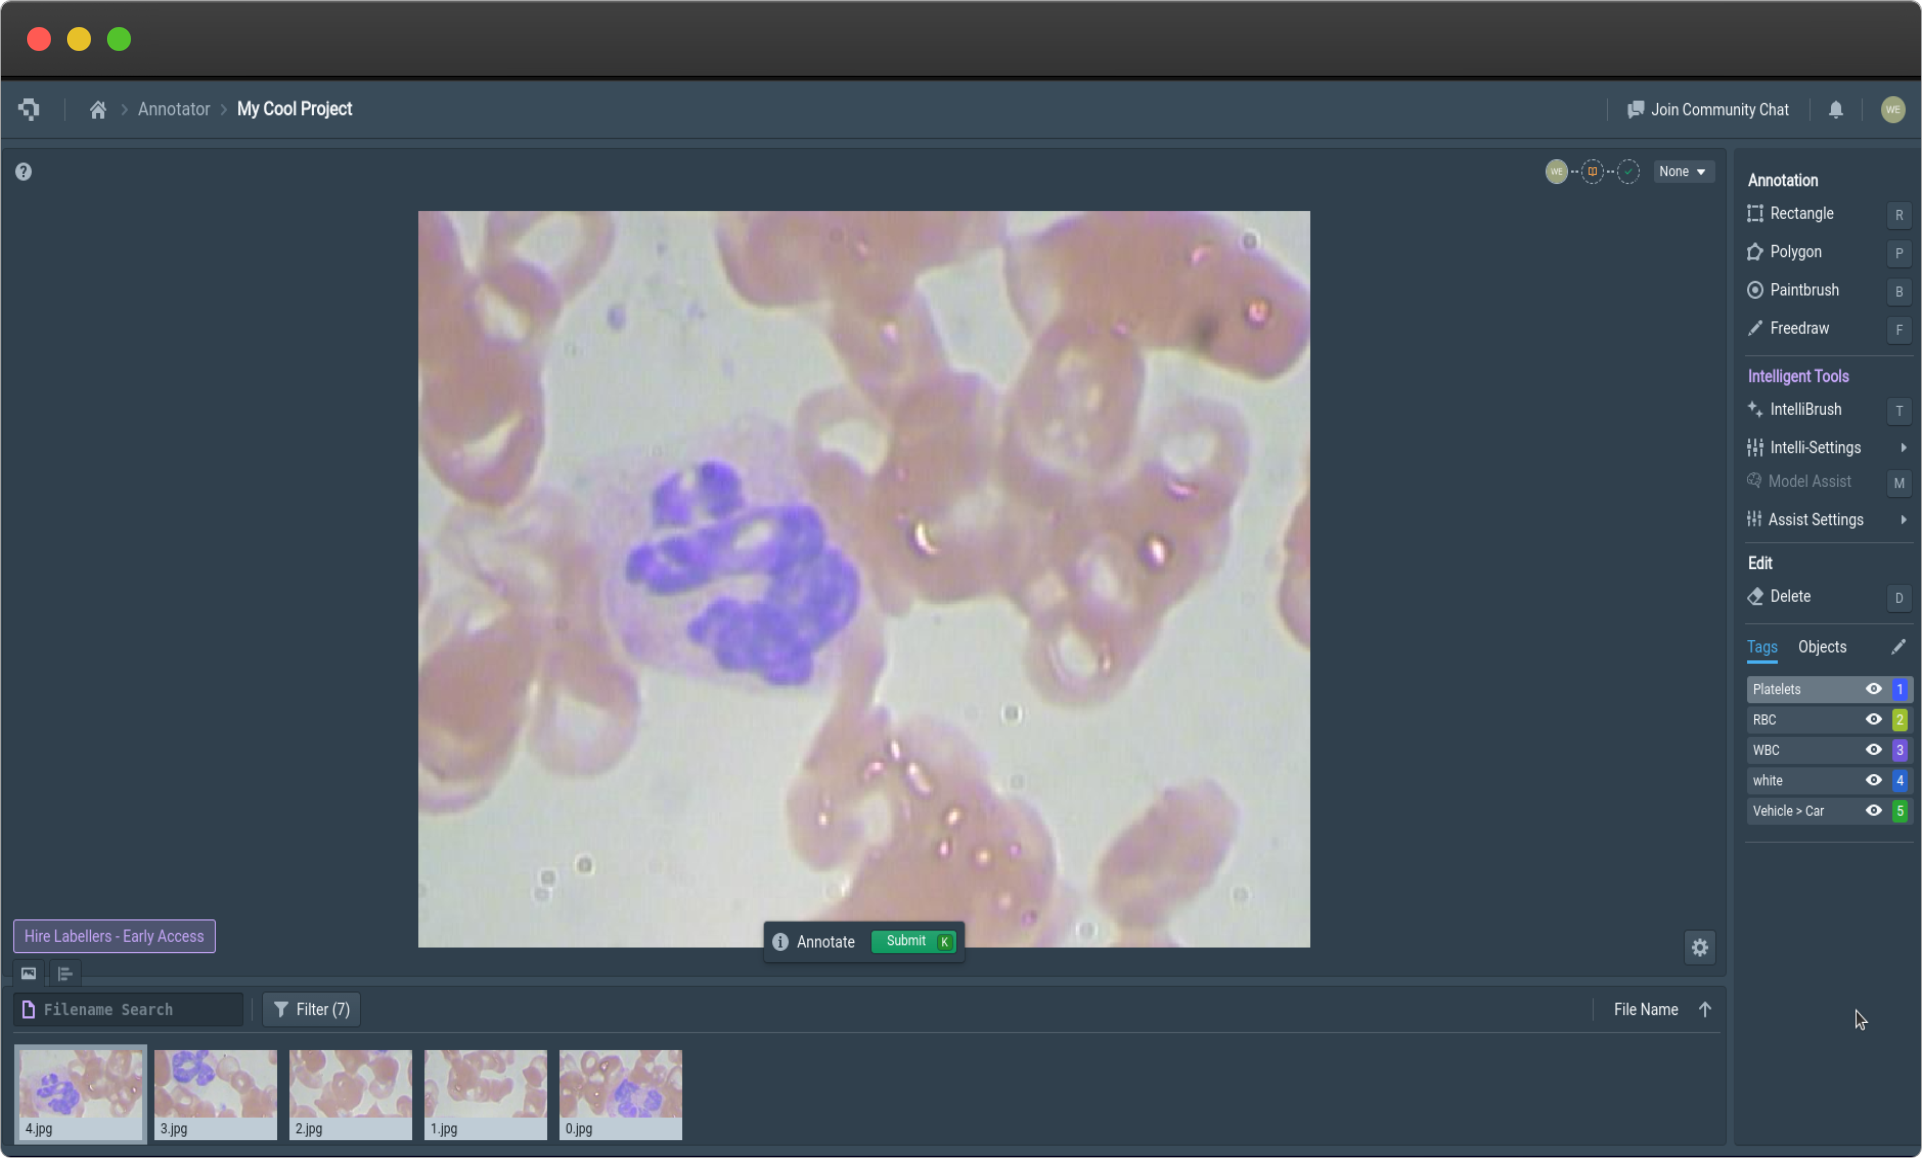
Example Annotator view for annotators (click on image to enlarge)
Once an asset has been marked for review, reviewers will be able to see it by enabling the Review Mode toggle. This will only be available to users who have been assigned to review assets. They can then reject or approve the asset either using red and green buttons or using the hotkeys N and K respectively, which will change the asset status based on what is defined in the Annotation Automation workflow.
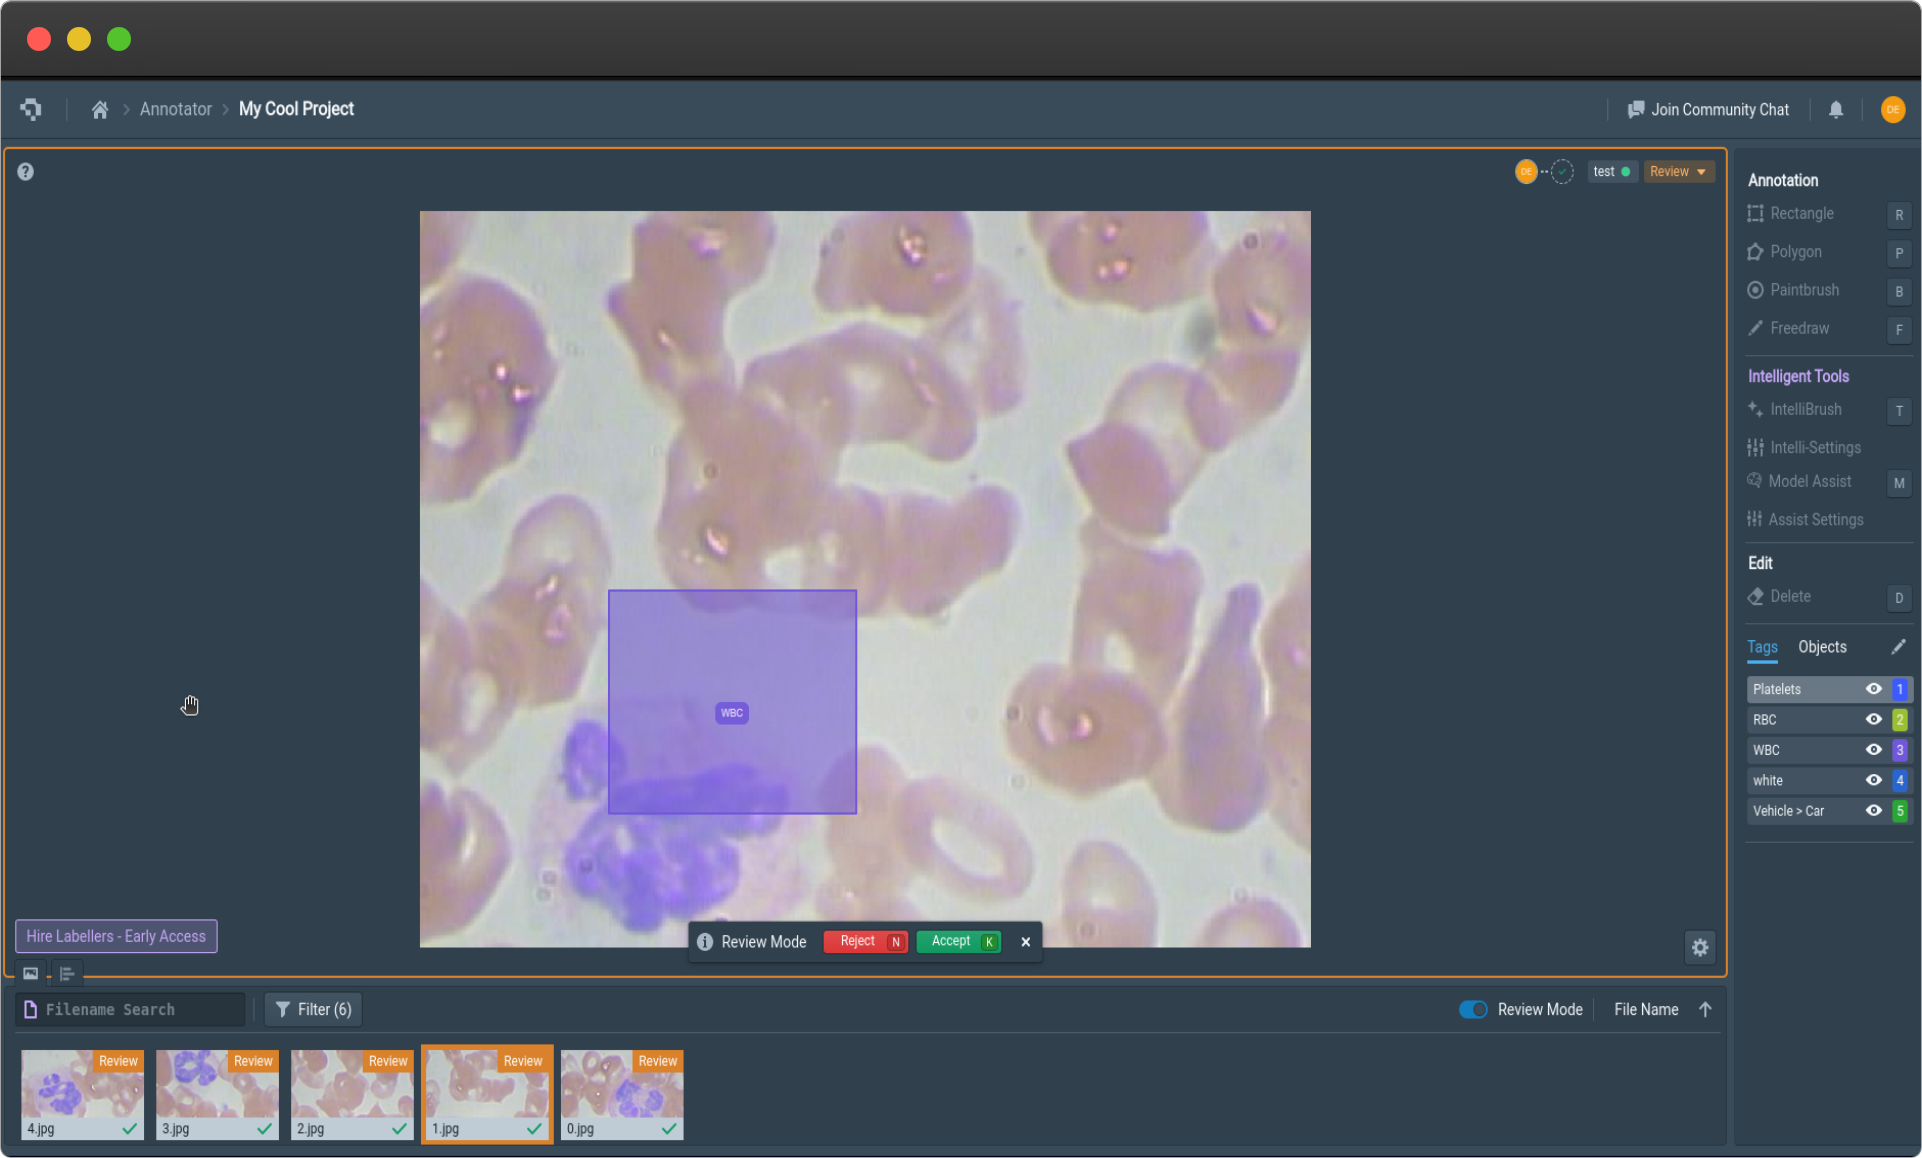
Example Annotator view in Review Mode (click on image to enlarge)
Additionally, the Annotator also displays helpful cues to show what stage is next for the asset in the annotation process. The top right corner displays dashed line segments that show the next blocks by their icons in the small circles. For example, in the sample view for the annotator, the top right line segment shows that a review block is next before it can be completed.
To accommodate and facilitate systems that involves multiple labellers annotating the same image for quality assurance purposes, we also provide the Consensus block which evaluates and gives scores to annotations based on their consistency with other labels. One can connect a Consensus block to To Annotate blocks with specified reviewers to review images with annotations from multiple labellers to review with greater ease. Reviewers can select their preferred annotations or opt to have the whole image annotated.
Our Trigger block allows for automated actions to be used in systematic ways. As a generic block, it has several general functions. The first function triggers the usage of a Datature model hosted deployment to make predictions on the image. The second function is a notification function which can be used to track completion of certain block stages. This can be used to reduce latency caused by human intervention and communication. The third function is a generic webhook which can be used to link to API routes such as Flask routes to automate custom processes that are necessary for unique use cases. With the Trigger block, one is able to integrate automated functions to increase productivity and facilitate large-scale collaboration with reduced human management.
Once all assets have been given a Completed status, you are now ready to train a model with these completed images!
Automation Blocks
There are six blocks that you can utilize to build your Automation workflow. The function of each block, how it interacts with the other blocks, and customizability will be explained in greater detail. To add a block, simply drag the preferred block from the bottom bar onto the workflow editor. To make connections between blocks, you can drag from one point on the block to another. To delete an edge, you can click on an existing edge and it will disappear. To delete a block all together, press Backspace.

Dataset
Dataset block in editor (click on image to enlarge)
The Dataset block contains unannotated assets that you have uploaded to Nexus. You can build multiple Dataset blocks and assign an asset group to each of them for more control over the assignment of assets. By default, all unassigned assets are selected. The dataset block can be thought of as an input node, in that it does not have any input edges going into, and only has output edges.
The output of the Dataset block can be connected to any of the following:
- To Annotate: Where assets in that block are marked to be annotated by annotators.
- To Review: Where assets can be directly reviewed without the need for any annotation work to be done. This assumes that you have already obtained annotations from a different source, such as annotation import or model-assisted labelling.
- Completed: Where assets are marked as Completed and ready to be fed to the model for training without the need for any reviewing.
To Annotate
To Annotate block in workflow editor (click on image to enlarge)
The To Annotate block allows you to assign project members as annotators to annotate the assets that are contained in the connected Dataset block. If no specific users are selected, all users will be assigned for annotation by default. In the Annotator page, each annotator will only be able to see the assets that they have been assigned to annotate.
The input of the To Annotate block can be connected to any of the following:
- Dataset: Multiple dataset blocks can be connected to the same To Annotate block, which means that any assigned annotators will have to annotate all the assets from the assigned assets from each dataset block.
- Consensus (Reject): Assets can be marked for re-annotation if the annotations are rejected during the Consensus stage.
- To Review (Reject): Assets can be marked for re-annotation if the annotations are rejected during the review stage.
The output of the To Annotate block can be connected to any of the following:
- Consensus: Assets that have been annotated by more than one labeller can be sent for consensus calculations to determine acceptable annotations or to identify any discrepancies.
- To Review: Assets that have been annotated can be reviewed by assigned reviewers.
Trigger
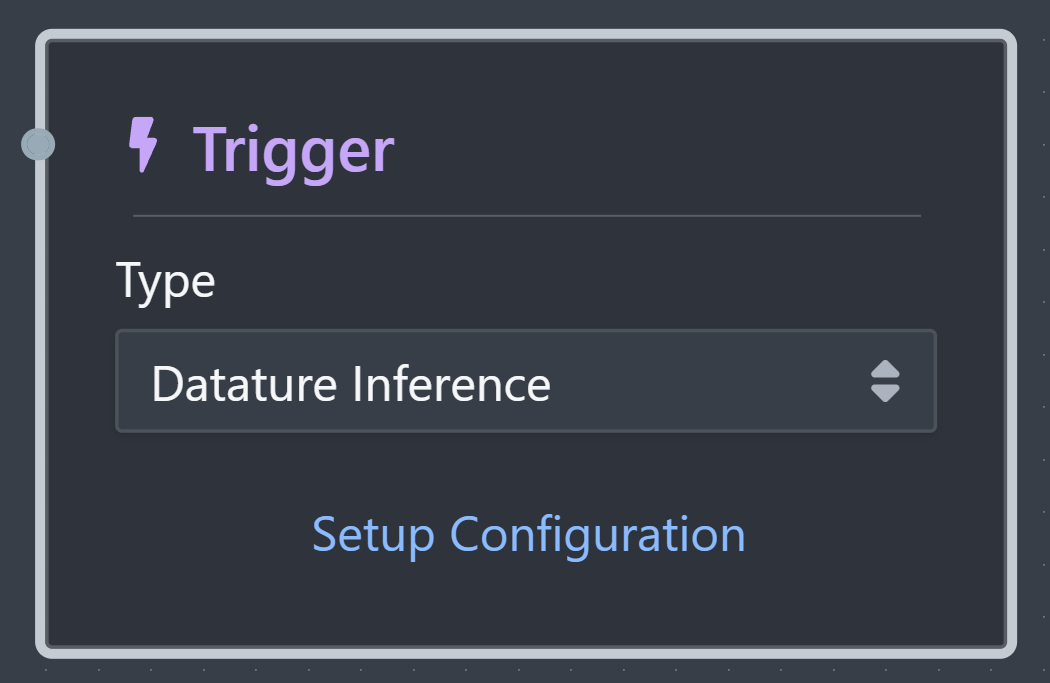
The Trigger block allows you to trigger user specified events. This is a generic block that will be used to integrate many other systems.
Using the Trigger block is only supported for dataset blocks with less than 20000 images. You make experience errors with datasets with a larger size.
| Trigger Type | Description |
|---|---|
| Datature Inference | Uses an ongoing Datature deployment for automatic annotation of the images assigned to the trigger block. |
| Webhook | Uses a custom URL for an API to call custom actions based on user developed routes. |
| Notifications | Notifications are triggered based on the information from the dataset. |
The input of the Trigger block can be connected to any of the following:
- Dataset: Data assigned to the the Dataset block can be connected to the Trigger block using the bottom node.
Datature Inference
With Datature Inference selected, new assets that are added to the connected Dataset block will then have the connected model deployment make predictions on them and save those predictions as annotations. These assets will then have the asset status Assisted as a model has assisted in prelabelling the data.
To setup the Trigger block, connect it to a corresponding Dataset block on the bottom node, and select Setup COnfiguration. This will then allow you to select deployments that are available for connection. Select the corresponding one and then save your annotation automation workflow.
Consensus

Consensus block in Workflow Editor (click on image to enlarge)
The Consensus block allows you to run annotations of the same asset by multiple annotators through our consensus algorithm. This allows you to assess the quality of the annotations and to resolve any duplicate annotations. Users added to this block will act as reviewers to resolve any duplicate or conflicting annotations. They can accept or reject annotations of assets based on their judgement. If an asset is accepted, only one final set of annotations will move on to the next stage. Multiple sets of annotations can all be rejected if the consensus reviewer deems necessary.
The input of the Consensus block can be connected to any of the following:
- To Annotate: This will take the manual annotations from your labellers to run through the consensus algorithm.
The Accept output of the Consensus block can be connected to any of the following:
- Completed: This will take the consensus annotations and mark them as completed.
- To Review: This will take the consensus annotations for further manual review.
- To Annotate: This will take the consensus annotations for further annotation.
The Reject output of the Consensus block can be connected to any of the following:
- To Annotate: This will take the rejected assets for re-annotation.
To Review
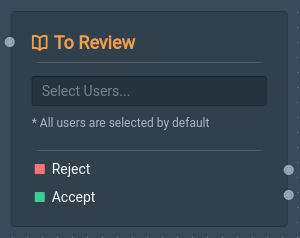
To Review block in Workflow Editor (click on image to enlarge)
The input of the To Review block can be connected to any of the following:
- Dataset: This will take assets and automatically have them reviewed. They should be used to review data that has been uploaded with corresponding annotations.
- To Annotate: This will take annotated assets for review.
- Consensus (Accept): This will take accepted consensus annotations for proper manual review.
- To Review: This will take previously reviewed assets for another round of review.
The Accept output of the To Review block can be connected to any of the following:
- To Review: This will take previously reviewed assets for another round of review.
- Completed: This will make the accepted assets marked as complete.
The Reject output of the To Review block can be connected to any of the following:
- To Annotate: This will take rejected assets for re-annotation.
- To Review: This will take previously rejected assets for another round of review.
Completed
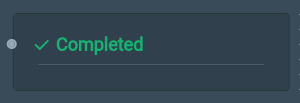
Completed block in Workflow editor (click on image to enlarge)
The Completed block can be considered an output block in that it takes in input edges but does not have any output edges. The input of the Completed block can be connected to any of the following:
- Dataset: Simply accepts all assets as completed.
- To Annotate: Takes annotations as is for completion.
- Consensus (Accept): Takes all accepted consensus-decided annotations for completion.
- To Review (Accept): Takes all reviewed and accepted annotations for completion.
Common Questions
Why have my assets disappeared in the Annotator page?
Our Asset Group Management will filter all assets that are assigned to you for annotation by default when you enter the Annotator page. If you aren't able to see any assets, this means that either your project owner has not assigned you to annotate any assets, or that you have completed the annotations for all your assigned assets.
If you are assigned to be a reviewer, you will need to click on Review Mode to view the assets that have the Review status.
What happens if I assign two annotators to label the same dataset?
If a consensus block exists, the two annotators' labels will be compared and at most one set of labels will make it through to the next stage. However, if the consensus block is absent, there will be duplicate labels on the same asset.
Can I include multiple review stages?
Yes, you can chain as many review blocks as possible depending on how strict your requirements are. Do remember to handle both Accept and Reject cases for each block to validate the workflow.
What happens if a reviewer rejects a set of labels?
The asset status will be changed to To Fix and sent back to the same annotator or a different annotator depending on how the workflow is set up. The new annotator will still be able to view the old labels for reference and can choose to modify those labels or to delete them and re-annotate entirely.
👋 Need help? Contact us via website or email
🚀 Join our Slack Community
💻 For more resources: Blog | GitHub | Tutorial Page
🛠️ Need Technical Assistance? Connect with Datature Experts or chat with us via the chat button below 👇
Updated 10 months ago