Using and Managing Your Deployed API
Once your API has been deployed, you can now make API requests. Nexus makes this easy to test and use through in a few different ways. We also facilitate API management and monitoring. All of this can be found in the Deploy page found through the sidebar menu on your project page.
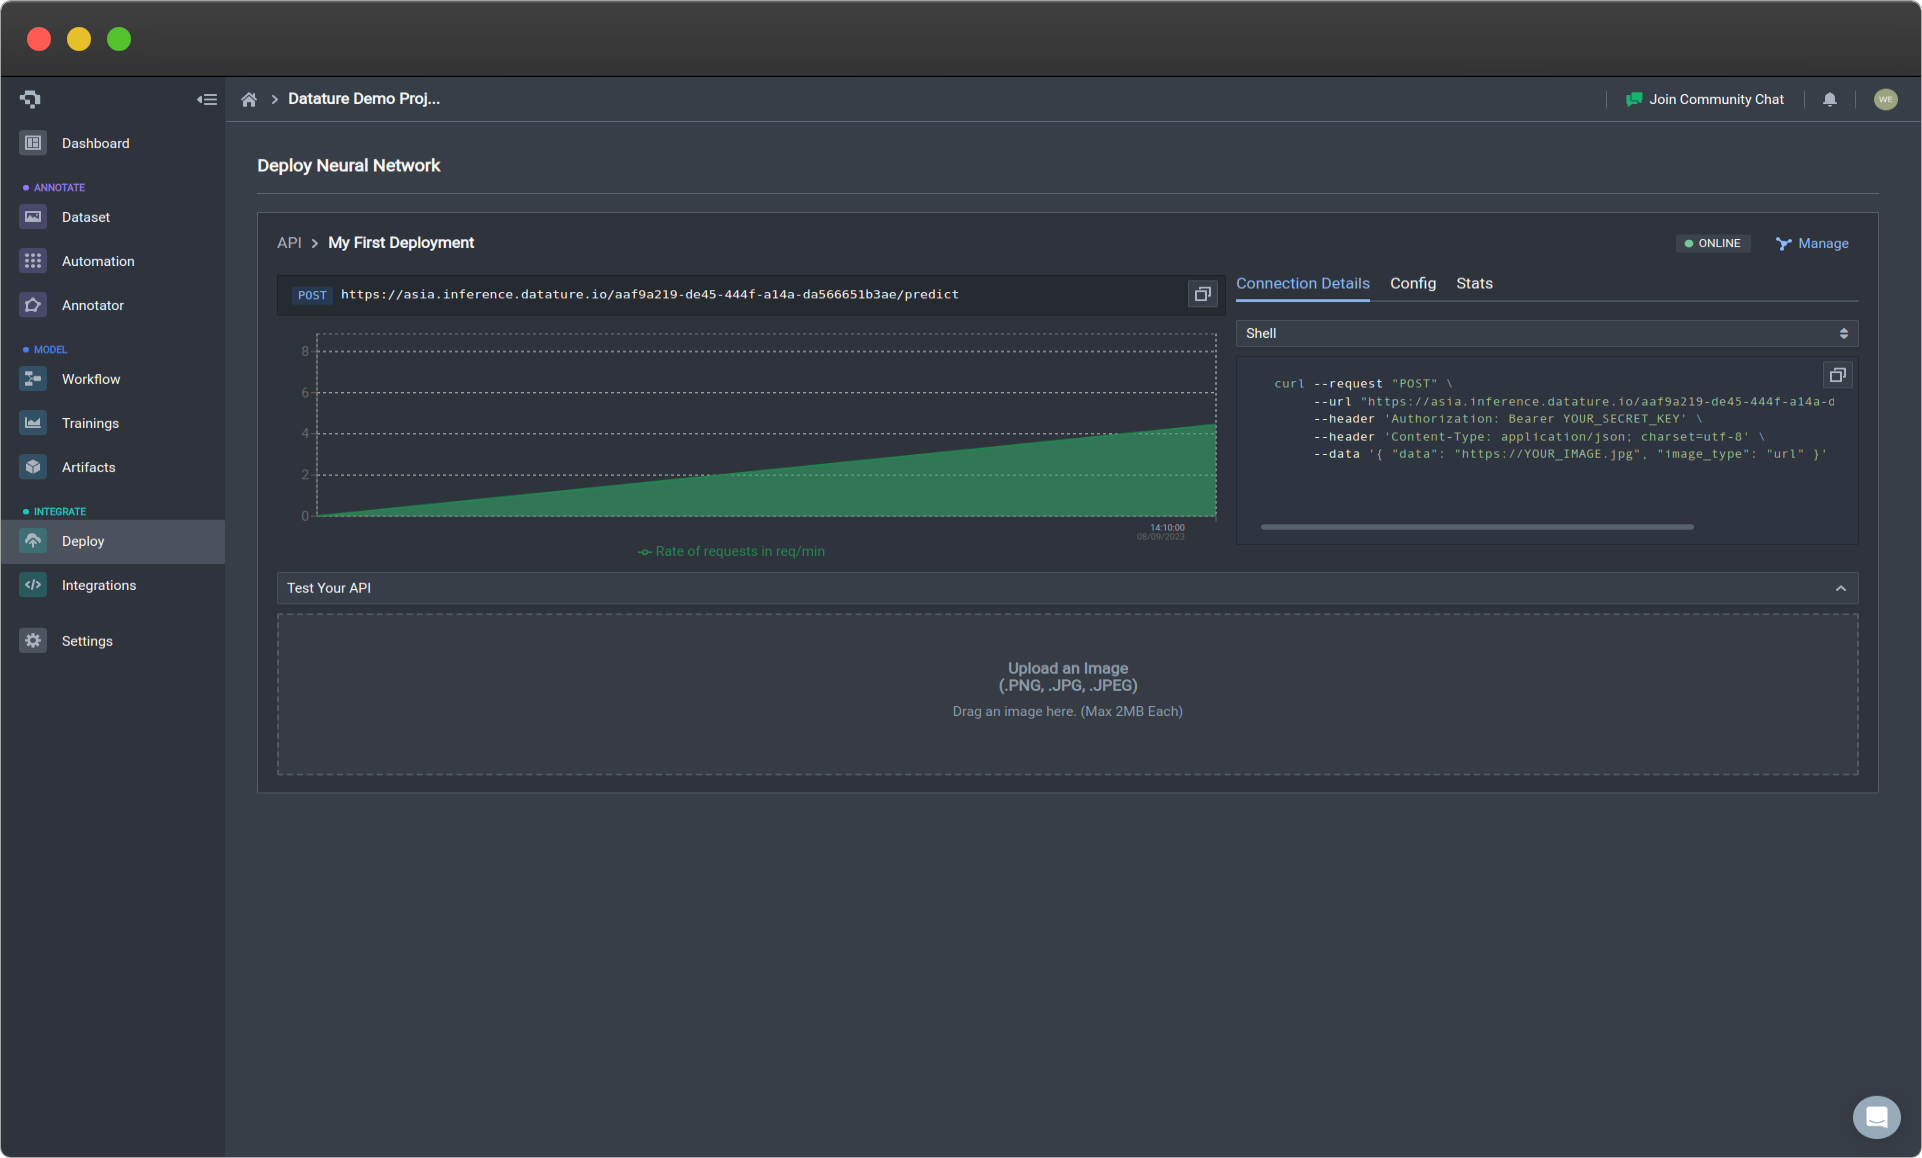
Active deployment (click image to enlarge)
API Deployment Usage
Your API is deployed on solely dedicated GPUs. What this means is that there are no restrictions on how you use your API. The performance of your API is only bounded by your compute. In order to see how API deployment performance might look like in practice, we provide example stress test statistics that can help guide in how you should be practically using your API.
API Request Process
Making API Requests
To make an API request, you should use code to make the call. Nexus auto-generates the code necessary to make API requests in all the most common languages. You can learn more about the auto-generated code in Connection Detail. Before you run your request, fill in the necessary fields in the code with your relevant information, such as the image type, data, and authorization. Below are the options we offer for image types and corresponding data input:
| image_type | data |
|---|---|
| url | String containing your URL |
| base64 | String containing your base64 image encoding |
| array | Nested array representing your image data in array form |
For the Authorization section, replace the YOUR_SECRET_HASH field with your generated secret.
After running the request on your chosen language, you should receive an output with the following format described below.
API Request Output
For Object Detection Bounding Box Models
Output Field | Description |
|---|---|
annotationId | Running Index of Annotation |
bound | Bounding box |
boundType | Type of prediction shape from model output. Can be either rectangle or masks |
confidence | Prediction confidence percentage |
tag | Object containing class label information that include:
|
Additional Information For Segmentation Mask Models
| Output Field | Description |
|---|---|
| contourType | Output format of segmentation predictions |
| contour | Polygonal x, y coordinates in the format of [ [x1, y1], [x2, y2], [x3, y3] ... [xn, yn] ], where n is the number of polygon vertices |
Additional Ingress/Egress Routines for API Requests
These routines can be added on top of your API requests to customize your inputs and outputs. This facilitates preprocessing and postprocessing tools that users may need. An example usage of such a routine would be the following:
{
    "image_type": "url",
    "data": "{{squirrel}}",
    "routines": [
        {
            "name": "ActiveLearningMetric",
            "arguments": {
                "class_name": ["squirrel", "butterfly"]
            }
        }
    ]
}
Routines List
Routine Name | Routine Type | Description |
|---|---|---|
Histogram | Egress | Outputs a histogram graph containing the instance distribution for all the classes in the predictions. The arguments needed are the following: |
FilterIOU | Egress | Filters prediction outputs based on IoU, where one can set their own IoU threshold. This routine is a no-op for classification models. The argument needed is the following: |
FilterConfidence | Egress | Filters prediction outputs based on corresponding confidence values, where one can set their own confidence threshold. The argument needed is the following: |
FilterClass | Egress | Filters prediction output for corresponding predicted class using user inputted list. The argument needed is the following: |
ExcludeClass | Egress | Filters against prediction output for corresponding predicted class using user inputted list. The argument needed is the following: |
ActiveLearningMetric | Egress | Provides an active learning metric, where higher values are associated with greater uncertainty and recommendation that users manually annotate this image for retraining. |
API Deployment Information
API Call Information
The upper part displays the URL for the API request as well as the type of API request on the left. Below the URL is an actively updated graph that can help you visually monitor the usage of your API in real time.
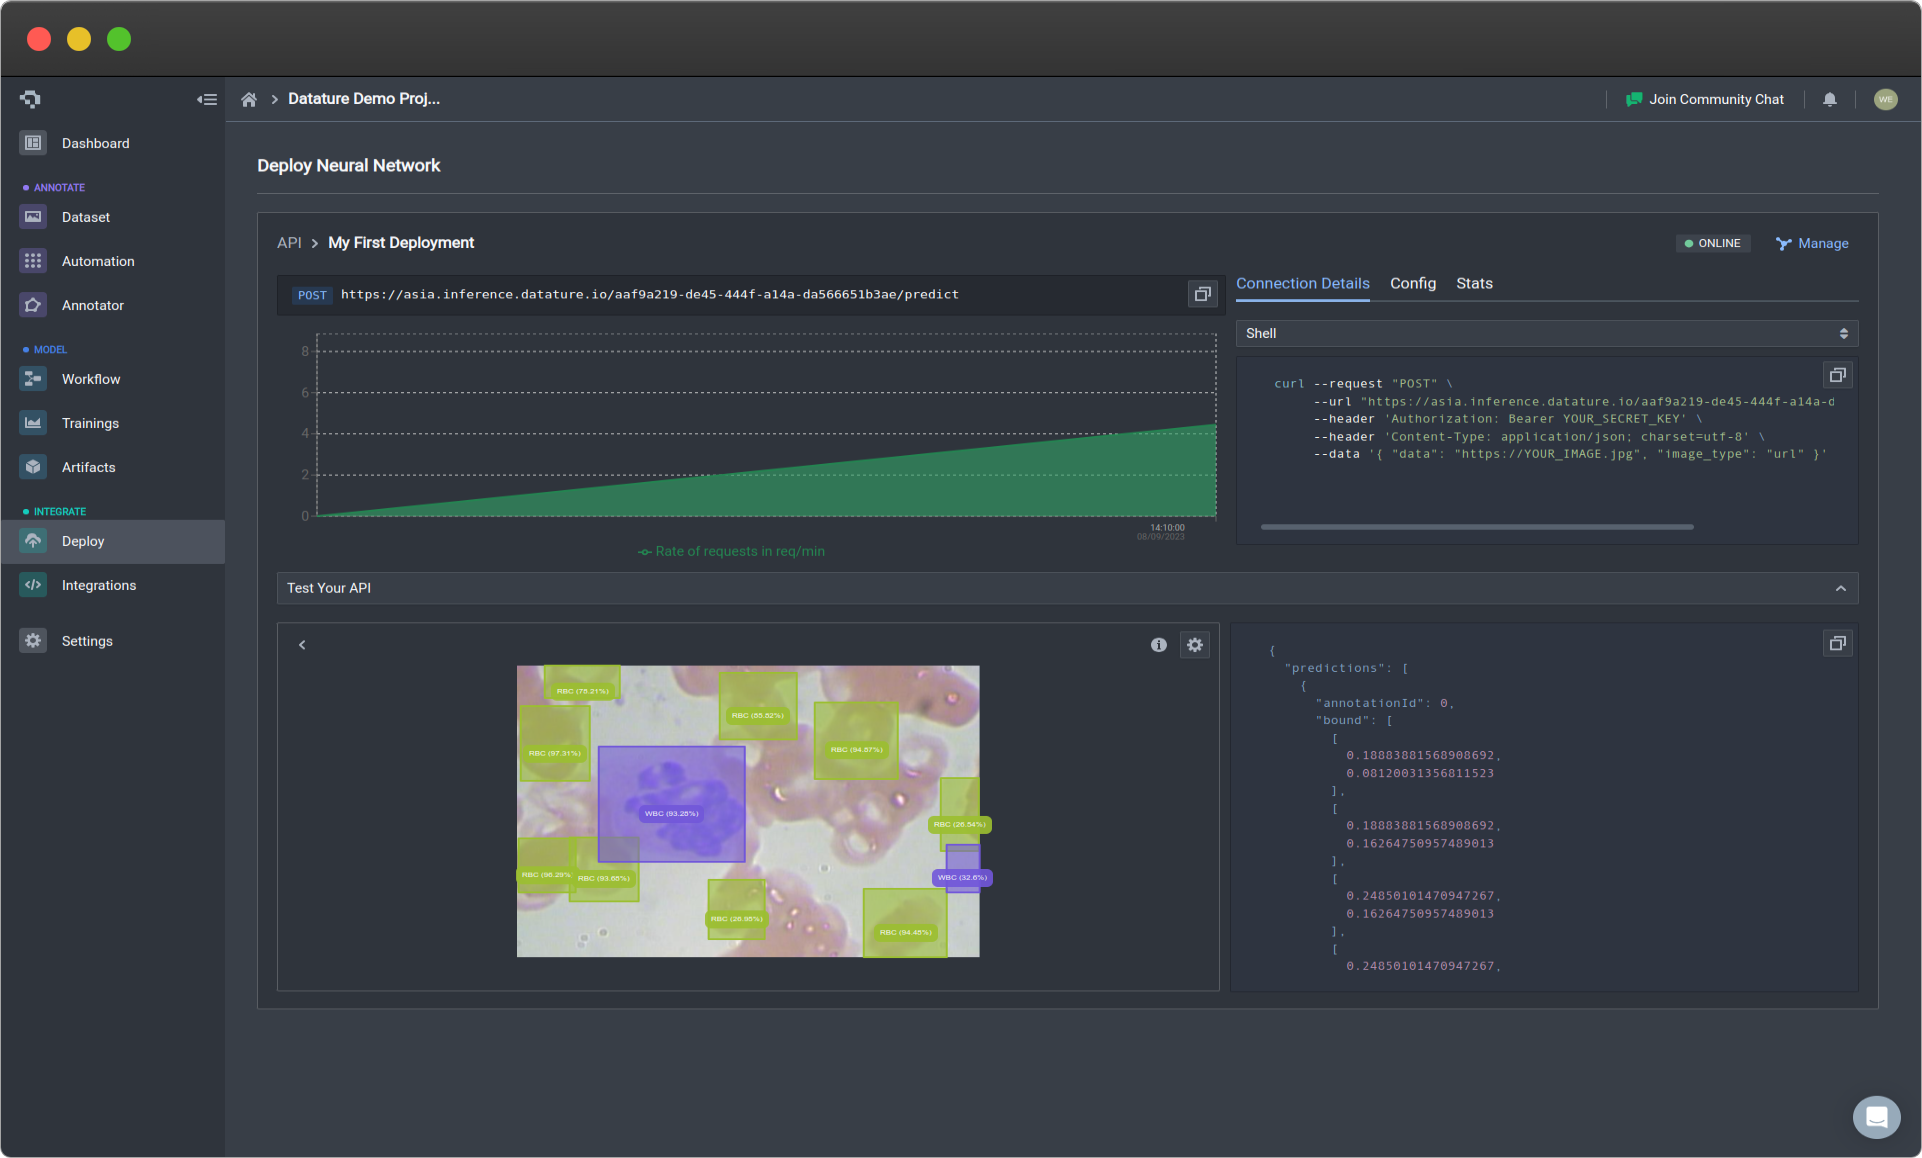
Graph to Visualize Requests Per Minute (Click image to enlarge)
Connection Detail
Nexus auto-generates the code necessary to make API requests in all the most common languages. All you have to do is replace the Authorization section with your generated secret, and your own image URL in the data section. The API request will then return a COCO formatted annotation JSON file which you can then use for your own use case as shown above.
Below are examples of the code we auto-generate:
curl --request "POST" \
     --url "https://<REGION>.inference.datature.io/75965b90-d29f-4981-8935-59ff53e1d35d/predict" \
     --header 'Authorization: Bearer YOUR_SECRET_HASH' \
     --header 'Content-Type: application/json; charset=utf-8' \
     --data '{ "data": "https://YOUR_IMAGE.jpg", "image_type": "url" }'
import requests
url = "https://<REGION>.inference.datature.io/75965b90-d29f-4981-8935-59ff53e1d35d/predict"
payload = {"image_type": "url", "data": "https://YOUR_IMAGE.jpg"}
headers = {
"accept": "application/json",
"content-type": "application/json",
"Authorization": "Bearer YOUR_SECRET_HASH"
}
response = requests.post(url, json=payload, headers=headers)
print(response.text)const options = {
method: "POST",
headers: {
Authorization: "Bearer YOUR_SECRET_HASH",
"Content-Type": "application/json; charset=utf-8",
},
body: JSON.stringify({
data: "https://YOUR_IMAGE.jpg",
image_type: "url",
}),
};
fetch("https://<REGION>.inference.datature.io/75965b90-d29f-4981-8935-59ff53e1d35d/predict", options)
.then((response) => response.json())
.then((response) => console.log(response))
.catch((err) => console.error(err));const axios = require("axios");
axios
.post(
"https://<REGION>.inference.datature.io/75965b90-d29f-4981-8935-59ff53e1d35d/predict",
{
data: "https://YOUR_IMAGE.jpg",
image_type: "url",
},
{
headers: {
Authorization:
"Bearer YOUR_SECRET_HASH",
"Content-Type": "application/json; charset=utf-8",
},
}
)
.then((response) => console.log(response.data));
orch.load(args.weight)
model.load_state_dict(checkpoint['state_dictimport java.io.IOException;
import java.io.InputStream;
import java.io.OutputStreamWriter;
import java.net.HttpURLConnection;
import java.net.URL;
import java.util.Scanner;
class Main {
public static void main(String[] args) throws IOException {
URL url = new URL("https://<REGION>.inference.datature.io/75965b90-d29f-4981-8935-59ff53e1d35d/predict");
HttpURLConnection httpConn = (HttpURLConnection) url.openConnection();
httpConn.setRequestMethod("POST");
httpConn.setRequestProperty("Authorization", "Bearer YOUR_SECRET_HASH");
httpConn.setRequestProperty("Content-Type", "application/json; charset=utf-8");
httpConn.setDoOutput(true);
OutputStreamWriter writer = new OutputStreamWriter(httpConn.getOutputStream());
writer.write("{ \"data\": \"https://YOUR_IMAGE.jpg\", \"image_type\": \"url\" }");
writer.flush();
writer.close();
httpConn.getOutputStream().close();
InputStream responseStream = httpConn.getResponseCode() / 100 == 2
? httpConn.getInputStream()
: httpConn.getErrorStream();
Scanner s = new Scanner(responseStream).useDelimiter("\A");
String response = s.hasNext() ? s.next() : "";
System.out.println(response);
}
}package main
import (
"fmt"
"io/ioutil"
"log"
"net/http"
"strings"
)
func main() {
client := &http.Client{}
var data = strings.NewReader(`{ "data": "https://YOUR_IMAGE.jpg", "image_type": "url" }`)
req, err := http.NewRequest("POST", "https://<REGION>.inference.datature.io/75965b90-d29f-4981-8935-59ff53e1d35d/predict", data)
if err != nil {
log.Fatal(err)
}
req.Header.Set("Authorization", "Bearer YOUR_SECRET_HASH")
req.Header.Set("Content-Type", "application/json; charset=utf-8")
resp, err := client.Do(req)
if err != nil {
log.Fatal(err)
}
defer resp.Body.Close()
bodyText, err := ioutil.ReadAll(resp.Body)
if err != nil {
log.Fatal(err)
}
fmt.Printf("%s\n", bodyText)
}require(httr)
headers = c(
`Authorization` = 'Bearer YOUR_SECRET_HASH',
`Content-Type` = 'application/json; charset=utf-8'
)
data = '{ "data": "https://YOUR_IMAGE.jpg", "image_type": "url" }'
res <- httr::POST(url = 'https://<REGION>.inference.datature.io/75965b90-d29f-4981-8935-59ff53e1d35d/predict', httr::add_headers(.headers=headers), body = data)
content(res, "text")require 'net/http'
require 'json'
uri = URI('https://<REGION>.inference.datature.io/75965b90-d29f-4981-8935-59ff53e1d35d/predict')
req = Net::HTTP::Post.new(uri)
req.content_type = 'application/json; charset=utf-8'
req['Authorization'] = 'Bearer YOUR_SECRET_HASH'
req.body = {
'data' => 'https://YOUR_IMAGE.jpg',
'image_type' => 'url'
}.to_json
req_options = {
use_ssl: uri.scheme == "https"
}
res = Net::HTTP.start(uri.hostname, uri.port, req_options) do |http|
http.request(req)
puts res.read_bodyCURL *hnd = curl_easy_init();
curl_easy_setopt(hnd, CURLOPT_CUSTOMREQUEST, "POST");
curl_easy_setopt(hnd, CURLOPT_URL, "https://<REGION>.inference.datature.io/75965b90-d29f-4981-8935-59ff53e1d35d/predict");
struct curl_slist *headers = NULL;
headers = curl_slist_append(headers, "accept: application/json");
headers = curl_slist_append(headers, "content-type: application/json");
headers = curl_slist_append(headers, "Authorization: Bearer YOUR_SECRET_HASH");
curl_easy_setopt(hnd, CURLOPT_HTTPHEADER, headers);
curl_easy_setopt(hnd, CURLOPT_POSTFIELDS, "{ \"data\": \"https://YOUR_IMAGE.jpg\", \"image_type\": \"url\" }");
CURLcode ret = curl_easy_perform(hnd);Stats
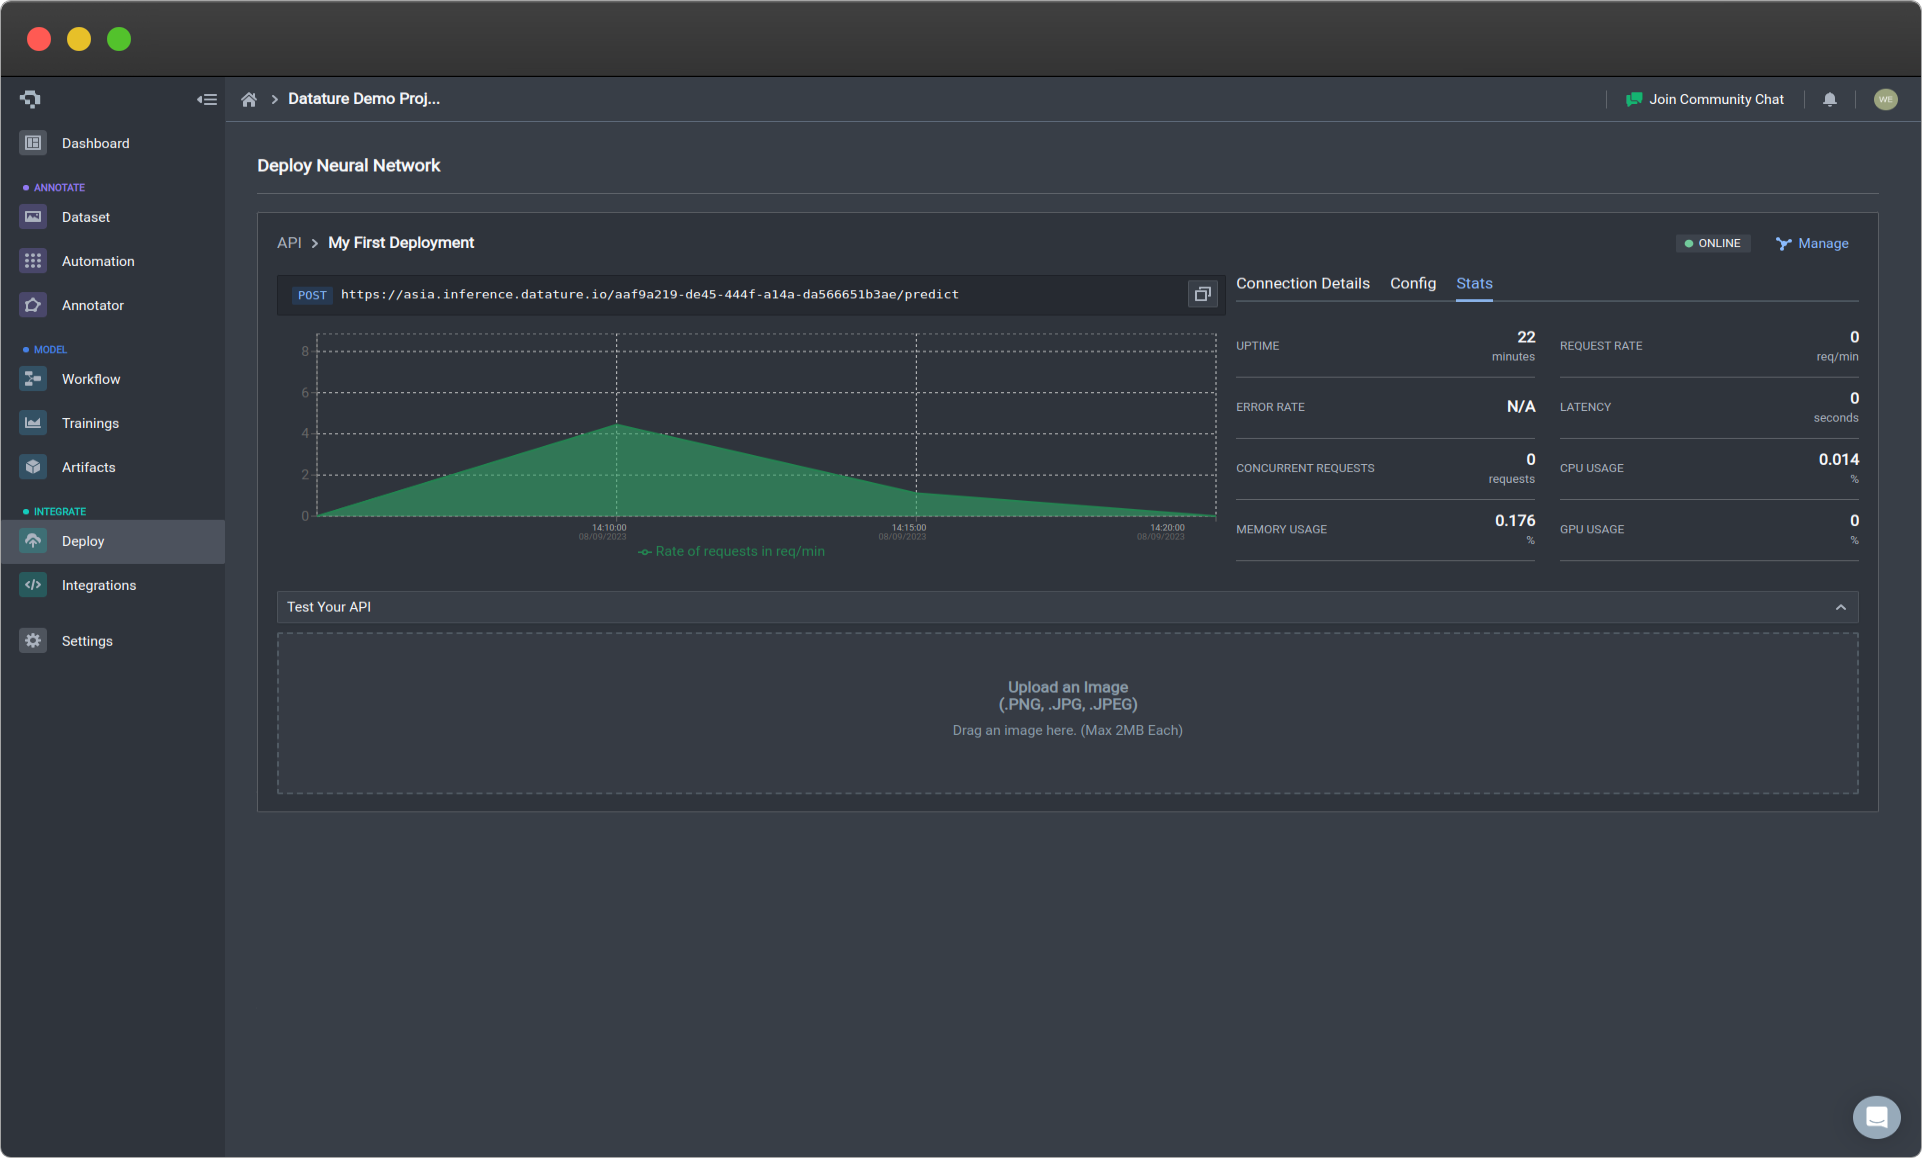
Stats menu (click to enlarge)
The statistics collected on the Stats tab will not include API requests made through Shell scripts.
The Stats tab provides essential information about how your API is running, in order to give you a more detailed evaluation of your API performance. A more detailed explanation about the statistics is listed below. To improve your API performance, looking at the Configuration section.
| Statistic | Description |
|---|---|
| Uptime | How long the API has been active for. |
| Request Rate | How frequently requests are being made. |
| Error Rate | How frequently requests to your API are receiving errors. |
| Latency | How long it is taking for the API to respond to a request. |
| Concurrent Requests | How many requests are occurring at once. This can be a good indicator of how many instances you want running. |
| CPU Usage | How much CPU is being used. |
| Memory Usage | How much memory is being used. |
| GPU Usage | How much GPU memory is being used. |
Managing Your API Deployment
By clicking on the Manage button on the top right of your deployment, you can view more in-depth statistics and modify configuration parameters.
Overview
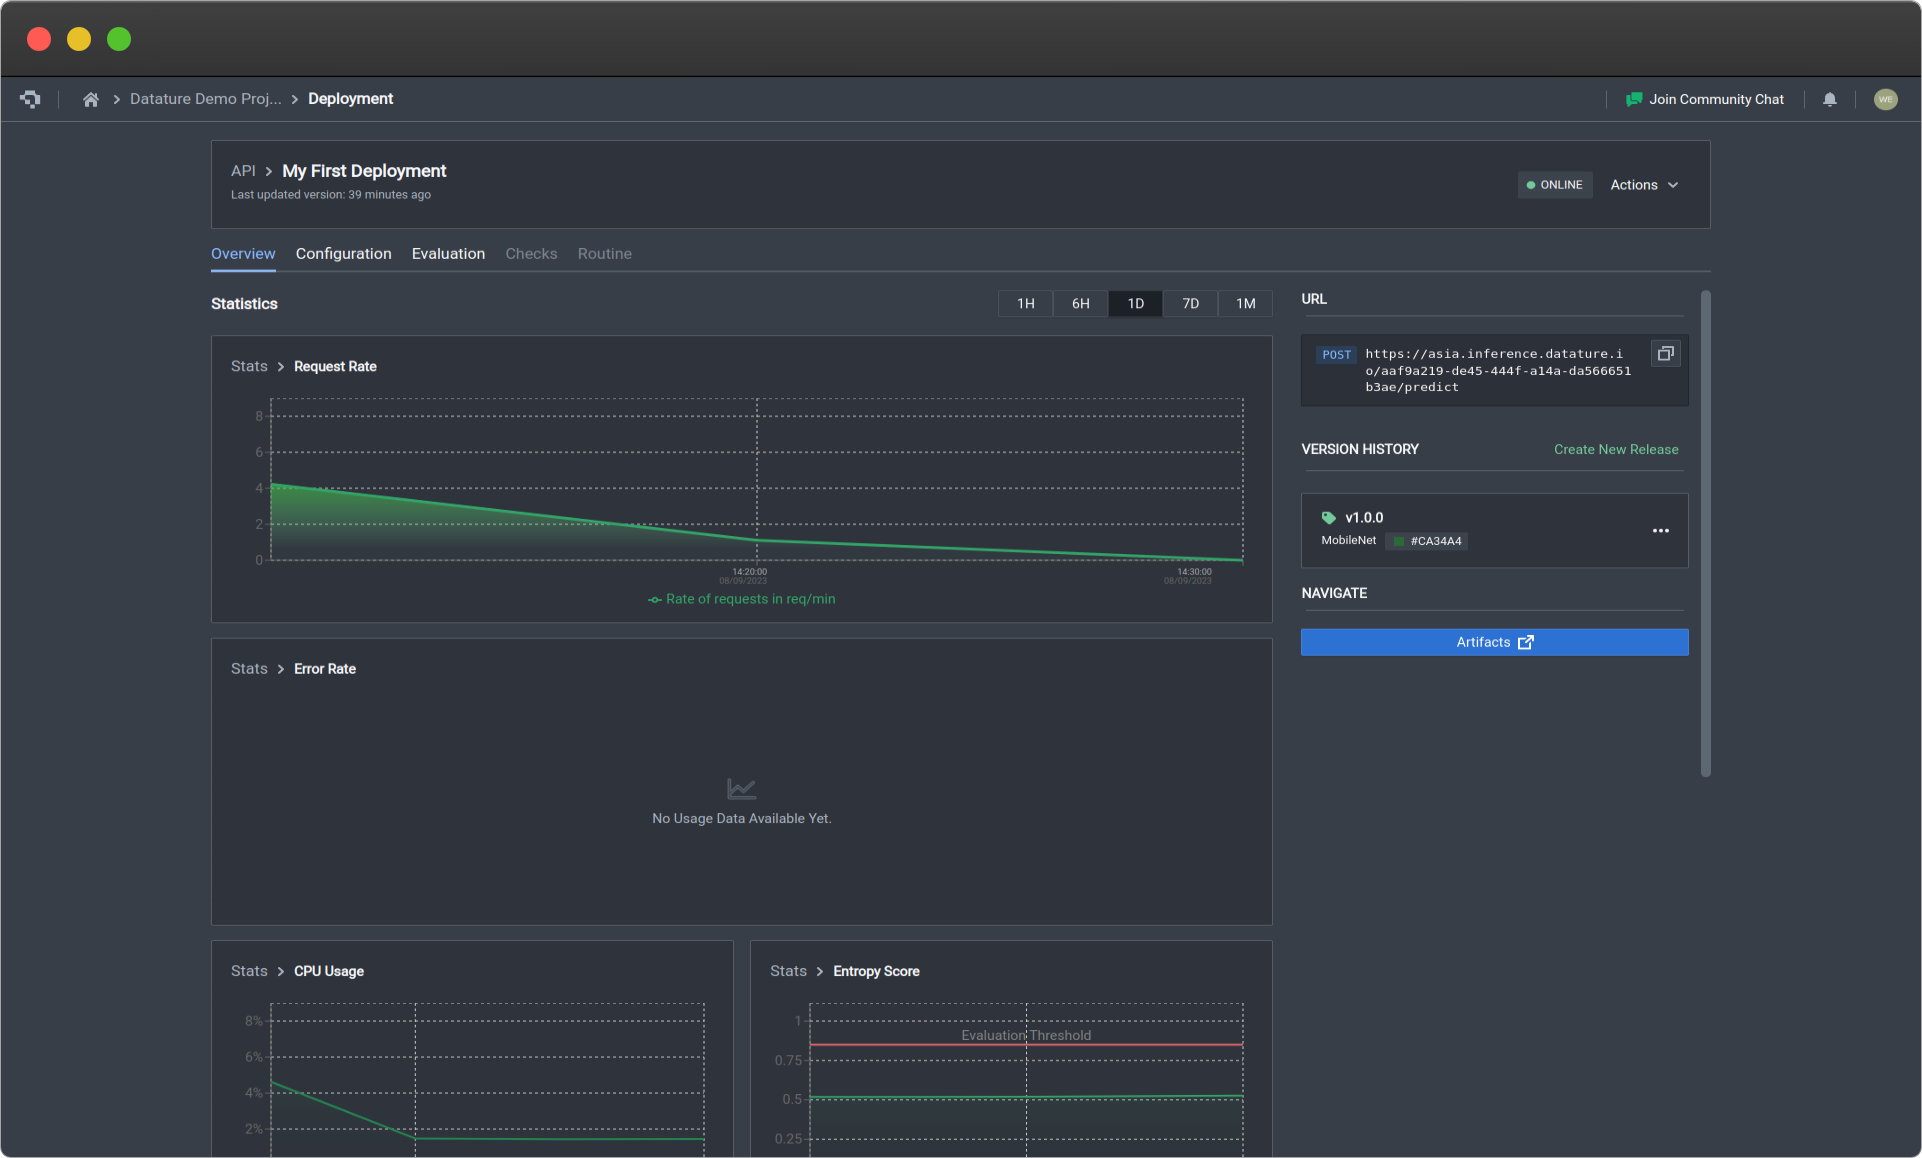
Deployment overview page (click image to enlarge)
The statistics collected on the Stats tab will not include API requests made through Shell scripts.
The Statistics section under the Overview tab provides essential graphs about how your API is running, in order to give you a more detailed evaluation of your API performance. A more detailed explanation about the statistics is listed below. To improve your API performance, looking at the Configuration section.
| Statistic | Description |
|---|---|
| Uptime | How long the API has been active for. |
| Request Rate | How frequently requests are being made. |
| Error Rate | How frequently requests to your API are receiving errors. |
| Latency | How long it is taking for the API to respond to a request. |
| Concurrent Requests | How many requests are occurring at once. This can be a good indicator of how many instances you want running. |
| CPU Usage | How much CPU is being used. |
| Memory Usage | How much memory is being used. |
| GPU Usage | How much GPU memory is being used. |
Configuration
In this menu, you can reconfigure the settings and details of your API deployment. The menu settings are exactly the same as the ones used in Deploying Your Trained Model as an API.
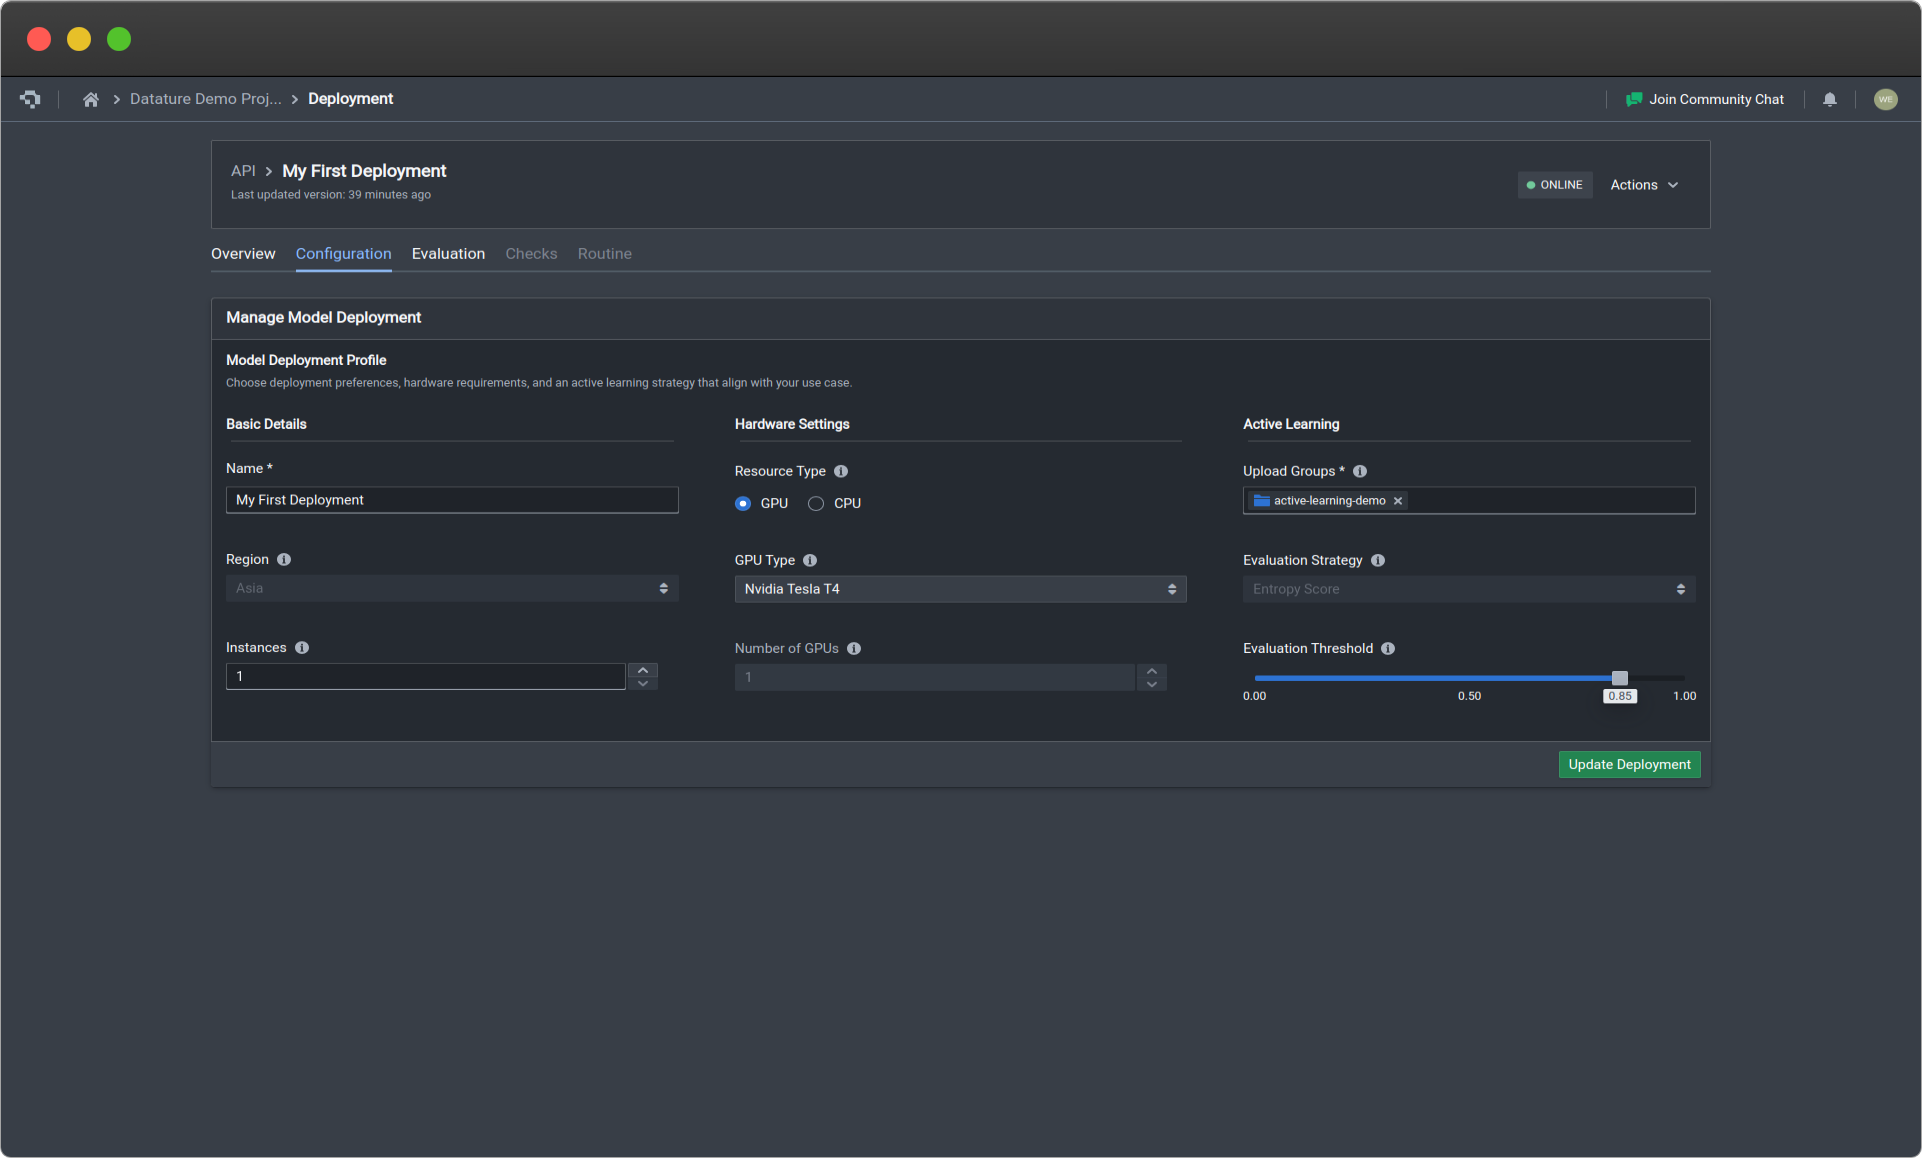
Deployment configuration page (click image to enlarge)
| API Deployment Menu Options | Description |
|---|---|
| Name | Your deployment name. |
| Instances | This is the number of gateways that your API will have for users to access. Select the number of instances based on scalability, redundancy, and efficient resource allocation needs. |
| Region (coming soon!) | Region in which your model is hosted. Choose a hosting location that optimises performance, meets regulatory requirements, and improves user accessibility. Currently defaults to Asia. |
| Evaluation Strategy (coming soon!) | Metric used for active learning. Choose a strategy that accounts for the dataset, model, and application, enhancing model accuracy iterations. Currently defaults to entropy score. |
| Evaluation Threshold | Threshold value for the evaluation strategy chosen above. Select an appropriate threshold to determine when a model is considered non-performant. A higher threshold requires stronger evidence to make positive predictions, and vice-versa. |
| Upload Groups | Assign assets to specific groups for processing to improve the model. |
| Version Tag | Unique version tag used for this deployment. |
| Resource Type | Select GPU for faster and more efficient inferences, while CPU is for less time-sensitive use cases. |
| GPU Type | It is the type of GPU being used that is attached to your API deployment that is ready on standby for your usage. To see more details about the differences in GPU types, go to Training Option : Hardware Acceleration. |
| Number of GPUs | It is the number of GPUs of the specified GPU type being used that is attached to your API deployment that is ready on standby for your usage. To see more details about the impact of this, go to Training Option : Hardware Acceleration. |
Evaluation
If you select the Test Your API button in the Evaluation tab, a drop down box will become available for you to drag an image in for prediction. The output will simulate what you will receive when using the code, and provides an easy and interactive way for you to understand how the API is functioning and a quick way to get predictions for single examples. It will show the JSON output on the right, and the visualisation of the image with its corresponding predictions on the left.
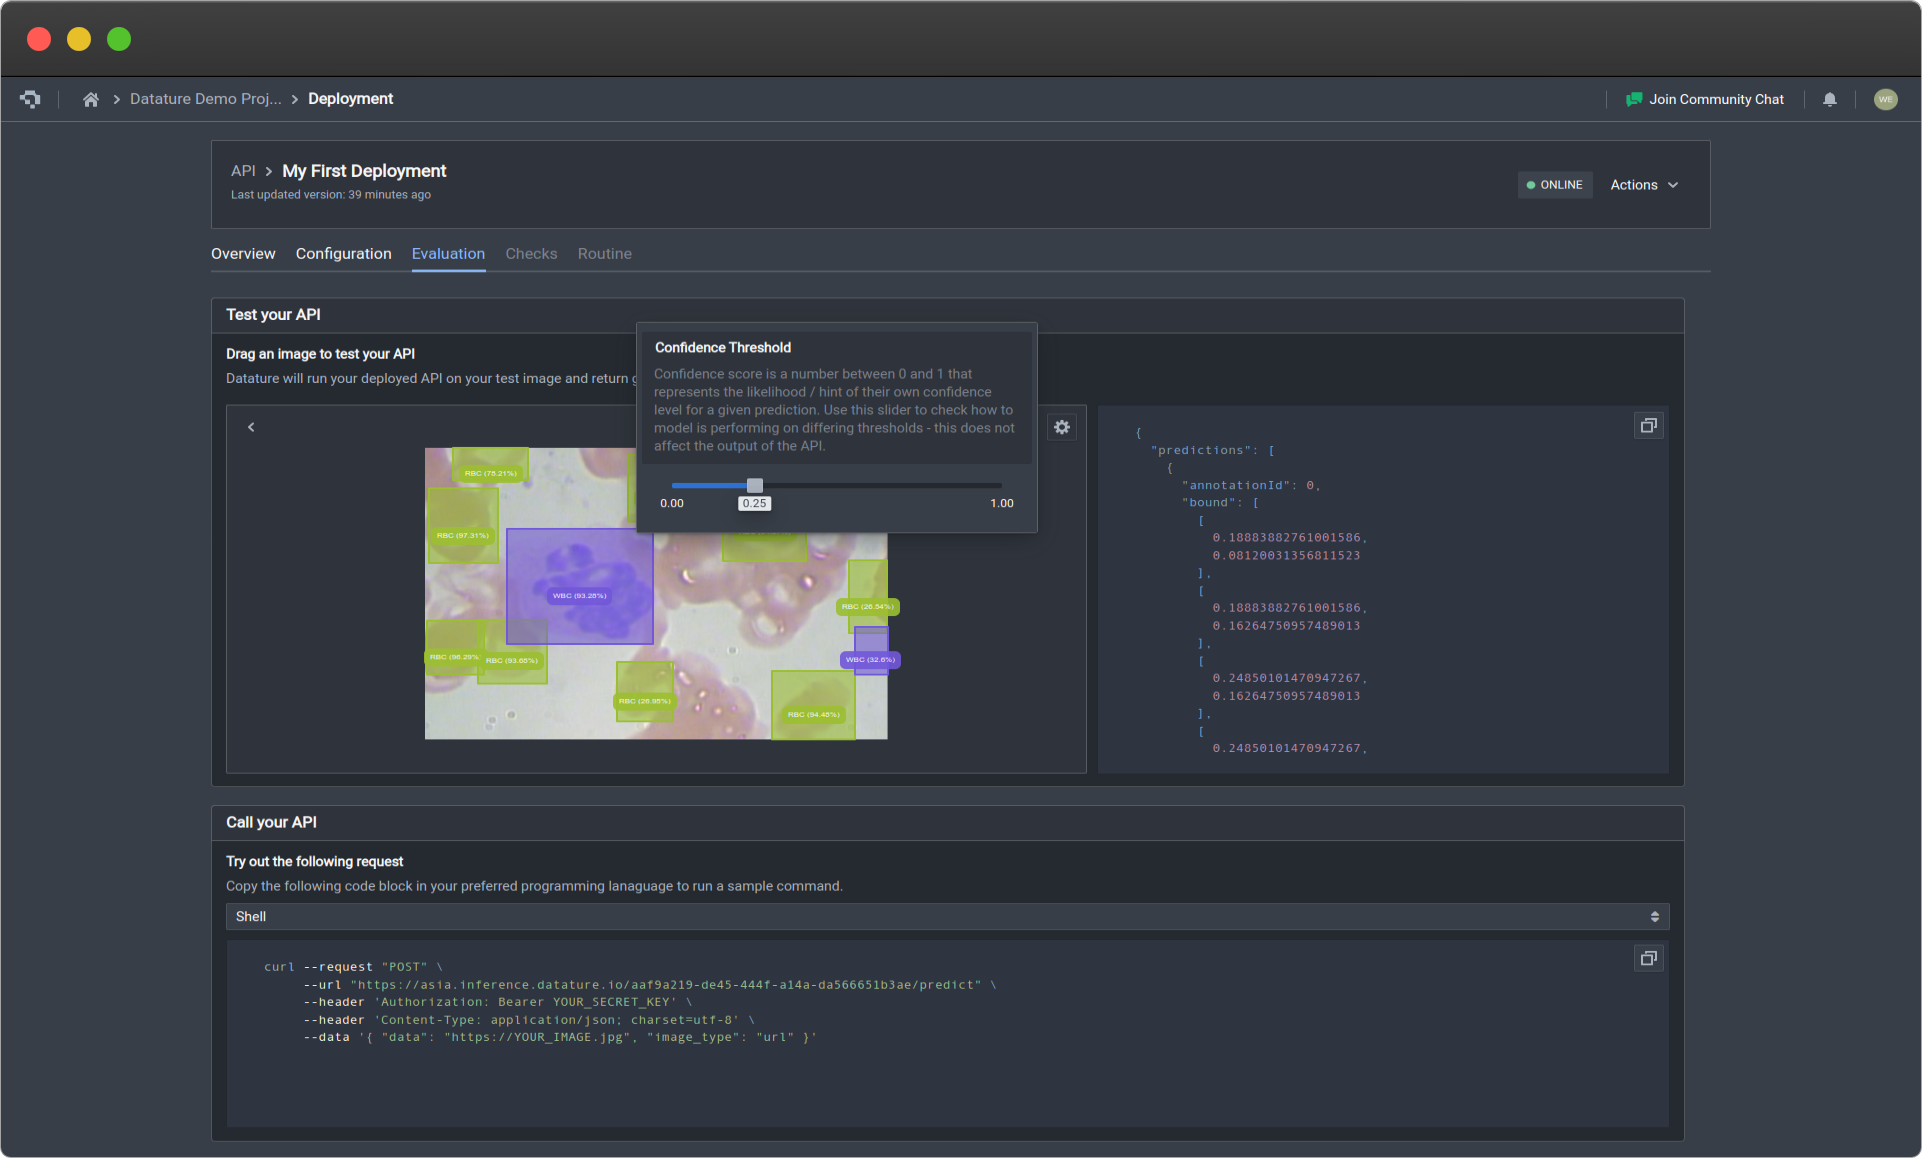
Test your API by uploading images (click image to enlarge)
Additionally, we have added options for Confidence Threshold. The slider will change the threshold so that it only displays predictions with confidence levels above the set threshold, which will allow you to filter the predictions based on confidence.
Deleting Your Deployment
If you do not see the Actions button at the top-right of your deployment section, please click on Manage at the top-right of your deployment section to access the deployment management page.
To delete your deployment, go to the Actions button at the top right of your deployment section. Then select Delete Deployment, and type in your deployment name to confirm. This will begin the process of deleting your deployment.
Common Questions
After I delete my deployment, will I be able to start the deployment again?
To restart your deployment, you need to redeploy your deployment. You will not be able to retrieve data about the deployment as well, so be sure that you are certain you do not want the deployment or anything about it. We currently do not offer any error recovery services.
What are ways to improve my API performance?
Increasing the number of instances will allow for more users of your API to have more access points, which will reduce any time waiting on that end. Through our Multi-GPUs Support, vertical and horizontal scaling to adapt to your use case is now possible. Selecting more advanced GPUs for boosted GPU power and increasing the number of GPUs will improve your performance by speeding up the calculations made during the inference period.
Is there a deterministic/fixed order in which API requests are handled?
No, the order in which requests are dealt with is not deterministic or controlled. This is due to the independent handling of each request, which provides ease of scalability but also means that there is no control over the order in which requests come in or the order for which they are handled.
Will there be any API key management?
Currently, we only use one key, which is the Project Secret Key as a means for authorization. However, down the line, we plan to provide multi-key authorization and API key management.
What if my programming language is not on the list of auto-generated languages?
Don't worry, if your programming language is not on the list of options, those are just examples that we offer for convenience. So long as your programming language supports REST API request capabilities, you can use that language.
What is the expected performance of the API deployment?
Here are some example stress tests to be used as a standardized reference.
Inference API Stress Tests
MaskRCNN 1024x1024 Deployed Model
Setup:
| Setup Options | Settings |
|---|---|
| Image | 1024x680 |
| API Call Argument | image_type: base_64, data: <"base64 encoded image string"> |
| Number of API Calls per Batch | 4 |
Results:
| Results | Values |
|---|---|
| Successful Calls Made (with 200 response) | 9998 |
| Failed Calls Made (with 500 response) | 2 |
| Total Calls Made | 10000 |
| Elapsed Time for Requests | 27441.17 seconds |
MobileNet 320x320 Deployed Model
Setup:
| Setup Options | Settings |
|---|---|
| Image | 640x480 |
| API Call Argument | image_type: base_64, data: <"base64 encoded image string"> |
| Number of API Calls per Batch | 50 |
Results:
| Results | Values |
|---|---|
| Successful Calls Made (with 200 response) | 99999 |
| Failed Calls Made (with 500 response) | 1 |
| Total Calls Made | 100000 |
| Elapsed Time for Requests | 2733.79 seconds |
👋 Need help? Contact us via website or email
🚀 Join our Slack Community
💻 For more resources: Blog | GitHub | Tutorial Page
🛠️ Need Technical Assistance? Connect with Datature Experts or chat with us via the chat button below 👇
Updated 5 months ago