
Building a Workflow
A workflow defines how your model will be trained -
Workflows on the Datature platform are built using a graphical user interface (virtual canvas), where you can define the types of image augmentation you want to use, the exact model you want to train, and a lot more by dragging and dropping some building blocks (aka modules).
To learn more about modules - read What are modules?. To learn more about the options for different modules - read Module : Dataset, Module : Augmentations, and Module : Model .
.png")
A Workflow on Workflow Canvas (Click image to enlarge)
Future SupportMore modules such as the Optimizers and Operations will be supported in future releases. Stay tuned!
If this is your first time building a workflow on Datature's platform, the level of customizability we offer for training parameters can appear quite overwhelming at first. With this in mind, Datature introduces a feature that automatically creates a usable workflow which you can work off of as a template or just immediately start running when you are Building a Workflow.
The button for this can be found on the bottom left.
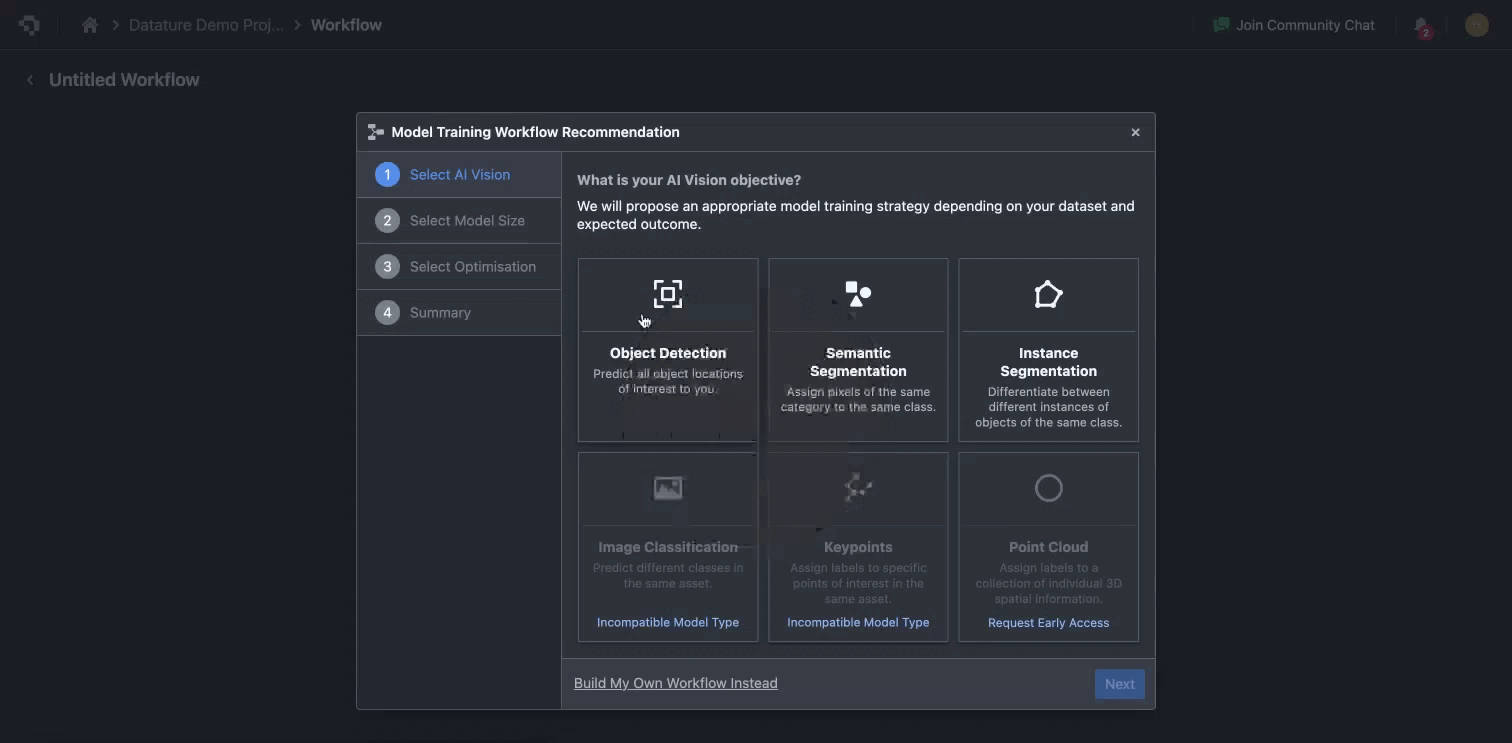
With the recommended workflow on the canvas, click each card (Dataset, Augmentation, Model) to customize the settings further.
What are Modules?
Modules are the building blocks of your workflow. The three supported modules - Dataset, Augmentations, and Model - represent distinct portions of your computer vision model pipeline. Simply drag and drop the modules (building blocks) to create a workflow.
The workflow follows a top-to-bottom approach, whereby the first module to be run is located at the top of the canvas and final module to be run is located at the bottom of the canvas. You will see an input port and output port located at the top and bottom of the module, which can be thought of as the connecting points between two modules.
Note that not all modules have both input and output ports, this is because some modules must go first or last. For instance, the Dataset Module does not have an input port as it must be the first 'block' of the workflow.
You can also customize each of these modules to define how you would like to train your model (i.e. setting your training parameters). For more details, refer to Module : Dataset, Module : Augmentations, and Module : Model.
Workflow Module Overview
The Dataset module is intended to be the first module, and has 1 output port and no input ports. They can be created by performing right-click on the canvas and selecting Datasets, then selecting the desired dataset.
The Augmentations module takes in data and performs pre-processing augmentations on it. It has 1 input port and 1 output port. The Augmentations module can be created by performing right-click on the canvas, then selecting Augmentations.
Upon creating the Augmentations module, you may customize the module to perform your desired augmentations. To get to the more advanced augmentations, set Advanced Mode to Yes. Only 1 Augmentations module is required for each workflow, regardless of the number of augmentation types enabled.
The Model module is intended to be the final module in the workflow, and has 1 input port and 0 output ports. It takes in the pre-processed data and begins the training. The Models module can be created by performing right-click on the canvas, then selecting Models, before selecting your desired model. After creating the Models module, click the module to edit its parameters.
In general, these types of workflows are supported currently:
- Dataset → Model
- Dataset → Augmentations → Model
To link one module to another, connect the output port of the source module to the input port of the target module by clicking and dragging between the two points.
To delete a module, click the desired module, then click on Delete Node.
Once you are satisfied with your workflow, you can start Running the Workflow.
The workflow page is essentially a canvas for you to better visualize the path that the individual data takes before being fed to the machine learning model. If you feel overwhelmed by the number of choices within the modules, choose Auto-Suggest Workflow.
👋 Need help? Contact us via website or email
🚀 Join our Slack Community
💻 For more resources: Blog | GitHub | Tutorial Page
🛠️ Need Technical Assistance? Connect with Datature Experts or chat with us via the chat button below 👇
Updated 11 months ago